Coaching volleyball for the first time? You’re in the right place! Whether you’re brand new to the sport or just new to coaching, this guide will give you the basics of volleyball and the essential tools you need to learn how to coach volleyball with confidence. We’ve broken it down into simple, easy-to-follow steps that will help you understand the game, teach fundamental volleyball skills, and prepare for volleyball practice and matches—all without feeling overwhelmed.
There’s no one right way to coach, and there’s no one right way to use this guide. You can read it from top to bottom or jump to the sections that are most helpful to you right now.
Ready? Let's dive in! Here's everything you can learn on this page:
1. Learn what makes the game of volleyball unique
Volleyball is an incredibly fun sport, and it is also quite unique. When learning the basics of volleyball, one of the first things to understand is that volleyball is played with six players on each side, separated by a net in the middle of the court. Unlike many sports, players don’t make contact with players on the opposing team.
Volleyball is a rebound sport, so there is no throwing or catching. All actions with the ball are made by rebounding or redirecting the ball with the forearms – as in a pass or dig – or the hands – as in a set, attack or block.
The six spots on the court where volleyball players play are right back, middle back, left back, left front, middle front, and right front. Before each serve, players must adhere to the volleyball overlap rules so they are in their proper positions. Players rotate clockwise every time they win a point when the opposing team is serving, which is part of the volleyball rotation rules (more on overlap rules and rotation rules in section 3). In the next section, you’ll get to see some of these unique aspects of the game in action!
2. Watch a game to learn the flow
Volleyball is all over YouTube! Watching a match is a great way to start learning how to coach volleyball and see the basics of volleyball in action.
Here are a few you can start with:
3. Understand how the game works
Before you start coaching, it’s essential to understand the basics of how volleyball is set up and played so you can effectively teach the game to your players. In this section, we’ll cover some fundamental elements of the sport you should know, including volleyball court dimensions, basic volleyball rules, how players rotate around the court, different volleyball positions, and some basic volleyball terms. We’ll also touch on volleyball rotation rules and volleyball overlap rules so you can better understand how the game flows. Let’s get started!
Volleyball court dimensions and lines
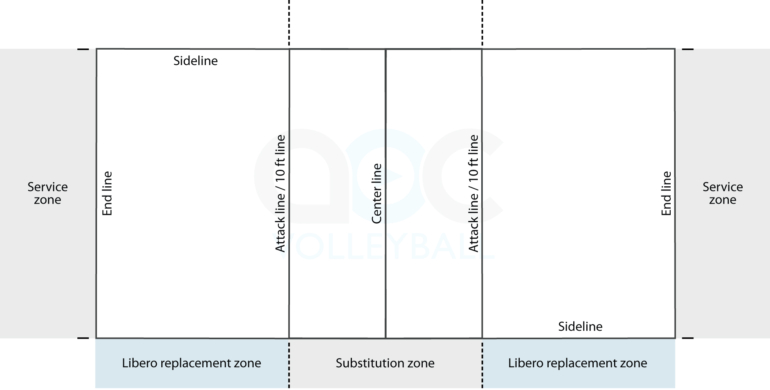
Indoor volleyball court dimensions are 29.5 ft x 59 ft (9 meters x 18 meters). Knowing the volleyball court size and the names of the volleyball court lines is important for first-time coaches because the court markings help players understand spacing, positioning, and movement during rallies. The court is divided by the center line, attack lines, sidelines, and end lines, and those markings affect both volleyball positions and volleyball rules.
Indoor volleyball court dimensions: 29.5 ft x 59 ft (9 meters x 18 meters)
Net height for women: 7′4 ⅛” (2.24 meters)
Net height for men: 7′11 ⅝” (2.43 meters)
Net height for U12: 7' (2.13 meters)
Net height for U10 girls: 6'6" (1.98 meters)

The diagram below labels the key lines and areas of the volleyball court you’ll use as a coach, including the sidelines, end lines, attack line (also called the 10-foot line), service zones, substitution zones, and libero replacement zones.
Basic volleyball rules and violations
If you're just starting your coaching journey, learning the basic volleyball rules is a great first step. Below is a simple summary of how the game is played, along with some key volleyball rules, violations, ref calls, and volleyball terms to help you build a strong foundation.
How play begins:
Every point starts with a serve from behind the end line. The first referee (up ref) will whistle to signal when the server is allowed to begin the serve.
Rallying:
Once the serve crosses the net, teams rally, or send the ball back and forth over the net until a fault occurs. Each team has a maximum of three contacts to return the ball to the opponent’s side to try to score a point. The first contact is a "pass," which is when a player rebounds the ball off of their forearms towards the setter. The second contact is a "set," where a setter uses either their hands or their forearms to send the ball to a hitter, who hits the ball over the net with one hand, called a "hit" or "attack."
How play ends/scoring:
A point is won when a team hits the ball to the floor on the opponent’s side, hits the ball off an opposing player, or the opposing team makes an error.
How a match works:
Volleyball matches are made up of sets, typically three or five sets where each set must be won by two points. Three-set matches (typically seen at lower levels) are two sets to 25 points and a third set to 15 points where the first team to win two sets wins the match. Five-set matches (typically seen at higher levels) are four sets to 25 points and a fifth set to 15 points where the first team to win three sets wins the match.
A few important things to note:
- Two teams of six players are separated by a net: three players in the front row, and three players in the back row on each side.
- Before each serve, players on each team must be in correct alignment, which is where volleyball overlap rules come into play.
- After the serve, front row players can switch positions along the net and back row players can switch positions in the back court.
- Players cannot hit the ball twice in succession. A block does not count as a hit, so a player can touch the ball when blocking and then immediately contact the ball again.
- The ball can be played off the net on a serve and during a rally.
- A ball hitting a boundary line is in.
- A ball is out if it hits an antennae, the floor completely outside the court, any of the net or cables outside the antennae, the referee stand or pole, or the ceiling above a non-playable area.
- A player can contact the ball with any part of their body.
- It is illegal to catch, hold or throw the ball, and you cannot block or attack a serve.
Common errors: The faults below result in a point for the other team. Rules can vary between high school, club, and college play, so check with your governing organization for specifics. Learn the ref signals for each of the calls here: Volleyball ref calls and signals.
- Four contacts: A team hits the ball more than three times before sending it over the net. Each team is only allowed three contacts per play (not counting blocks).
- Lift/carry: A player holds the ball too long when setting; the ball comes to rest in the player's hands instead of being rebounded quickly.
- Double contact: When setting the ball over the net, a player contacts the ball twice in a single attempt, often causing the ball to spin.
- Foot fault: A player steps on or over the end line while serving.
- Net violation: A player touches the net while making a play on the ball. Rules for whether hair or clothing touching the net is okay differ by organization.
- Center line violation: A player cannot fully cross the center line under the net in a way that interferes with the opponent or creates a safety hazard. Rules for how much of the body can cross differ by organization.
- Out of rotation: Players must maintain their rotational order throughout the game. If a team has players out of order when the ball is served, it’s a violation, and the opposing team gets a point.
- 10-ft line violation: A back-row player jumps in front of the 10-ft line (also called the 3-meter line) and attacks the ball above the height of the net. This is only legal if they jump from behind the line.
Volleyball player positions
The key volleyball player positions are setter, outside hitter, opposite hitter, middle blocker, libero, defensive specialist, and serving specialist. Understanding these volleyball positions helps first-time coaches see how each player contributes to offense, defense, and serve receive. Learn more about what makes each position unique below.
Setter (S)
The setter is the playmaker of the team, responsible for delivering accurate sets to the hitters and running the offense. They typically take the second contact and aim to put the ball in the best position for an attack. A good setter needs strong decision-making skills, quick hands, and great communication with teammates.
Libero (L)
The libero is a defensive specialist who wears a contrasting jersey and cannot attack the ball above the net. They focus on passing and digging, often replacing middle hitters in the back row to improve the team's defense. The libero can replace any back row player at any point without counting as a substitution but cannot rotate into the front row. The libero is often short, quick, aggressive in defense and a natural leader.
Middle Hitter (MH)
Also known as a Middle Blocker, middle hitters are responsible for quick attacks at the net and blocking opposing hitters. They need to be fast and agile to transition between offense and defense efficiently. A strong middle hitter can read the opponent’s plays and close blocks with the outside and opposite hitters.
Outside Hitter (OH)
Also known as a Left Side Hitter, the outside hitter is one of the primary attackers and plays on the left side of the court. They need to be versatile, as they not only attack but also play defense and pass in serve receive. Consistency and smart shot placement are crucial for outside hitters.
Opposite Hitter (OP)
Also known as a Right Side Hitter, the opposite hitter plays on the right side of the court and is often a strong attacker and blocker. They help defend against the opposing outside hitter and provide a key attacking option. Many opposites are left-handed, giving them an advantage when hitting from the right side.
Defensive Specialist (DS)
A defensive specialist is similar to a libero but does not wear a contrasting jersey and has regular substitution limitations. DS players focus on passing, digging, and covering the court defensively, often subbing in for front-row players who are weaker in the back row.
Serving Specialist (SS)
A serving specialist is a player who is subbed in specifically to serve, often replacing a player with a weaker serve. They should have a strong and consistent serve that puts pressure on the opponent and can target weaker passers.
Basic volleyball terms you should know
Below are some of the most important volleyball terms every coach should know. Understanding these volleyball terms will help first-time coaches communicate more clearly with players, refs, and parents. For a full list of volleyball terms, see our Volleyball Glossary.
- Ace: A serve that lands in the opponent’s court untouched or cannot be returned, resulting directly in a point.
- Kill: An attack that results in an immediate point or side out because the opponent can’t return it.
- Pass: The first contact after a serve or free ball where a player directs the ball toward the setter to start the offense. When passing a serve, it's called "serve receive."
- Dig: A defensive move where a player prevents the ball from hitting the floor after an opponent’s attack.
- Block: A defensive move by a front row player where they jump and press both arms over the net in order to stop the attacker from hitting the ball onto their side.
- Side out: When the receiving team wins the rally and gains the right to serve.
- Rotation: The clockwise movement of players to a new position on the court after their team sides out and earns the right to serve.
- Free ball: A non-aggressive ball sent over the net (usually as a pass) instead of an attack, which gives the opposing team an easy opportunity to set up an attack.
- Transition: The shift between offense and defense, either moving from defense to offense after the opponent attacks the ball, or from offense to defense after your team attacks.
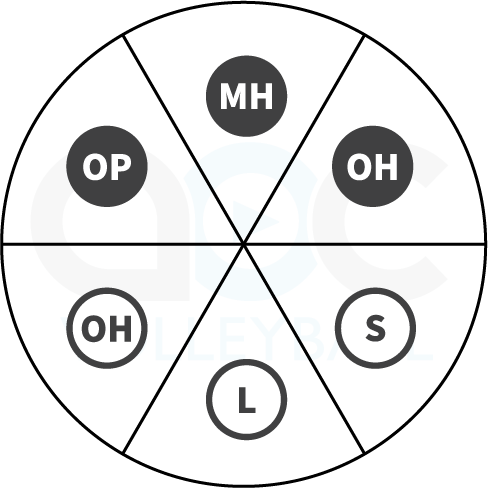
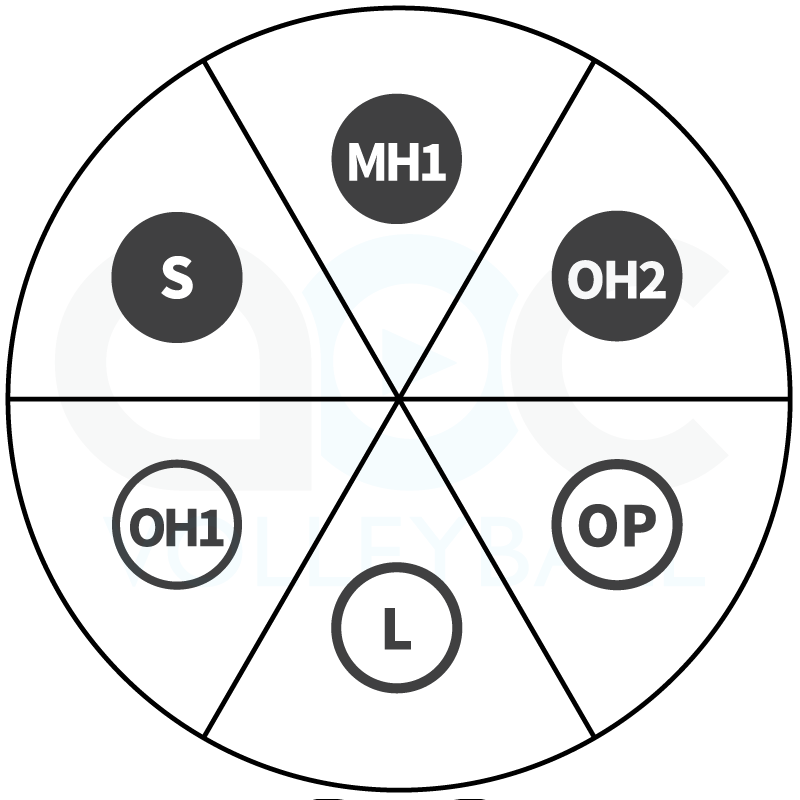
Volleyball zones of the court
The volleyball court is divided into volleyball zones numbered 1 through 6, as seen in the diagram. These zones aren't visible on the court, but knowing where they are will help you communicate court positioning, rotation and playing strategies to your players. Zones 1, 6 and 5 make up the back row of the court, while zones 4, 3, and 2 are in the front row. Zone 1 is the right back corner, and from there the numbers move clockwise around the court. Once a player rotates into Zone 1, they are the server. A common use for zones is telling players which zone to serve or attack to, in order to target a certain player or spot on the court.

Volleyball rotation rules
A rotation in volleyball refers to the starting positions of the six players on the court at the moment the ball is served. Teams rotate clockwise every time they earn the right to serve by winning a rally that started with a serve from the other team, also known as a side out. All six players shift one position, with the player in Zone 2 (right front) moving to Zone 1 (right back, serving position), the player in Zone 1 moving to Zone 6 (middle back), and so on. Once the server contacts the ball, players can move freely around the court, but before contact, they must follow the volleyball overlap rules so their alignment is legal.
Rotations are named based on where the setter starts the rally. Rotation 1 is always the rotation when the setter is serving from Zone 1 (right back).
When the team wins a side out and rotates so the setter moves from Zone 1 to Zone 6 (middle back), the team is now in Rotation 2. Each time the team rotates again, the rotation number changes based on the setter’s new starting position. When the setter rotates all the way back to the serving position in Zone 1, the team is in Rotation 1 again.
It’s important to note that rotation numbers and zone numbers are completely independent. Rotation numbers refer to where the setter is in the serving order, while zone numbers describe fixed areas of the court.
It's also important to note that you can start in any rotation you want–you don't have to start in Rotation 1. The opponent can also start in any rotation they want.
Watch the diagram to see volleyball rotation in action. The numbers on the court represent the six volleyball zones. To see a more in-depth discussion of volleyball rotation rules, watch this video: Understanding volleyball rotations.
4. Learn how to teach the six volleyball skills and movement around the court
Teaching the fundamental volleyball skills is one of the most important things you’ll do as a coach—especially at the beginner level. These skills are the building blocks of the basics of volleyball, and helping young players learn them early (and correctly!) sets them up for long‑term success and confidence on the court. In this section, you’ll learn how to coach volleyball fundamentals by breaking down the six essential volleyball skills: serving, passing, setting, attacking, defense, and blocking.
You'll find simple explanations, tips for teaching each skill to beginners, and short video demonstrations to help you see what good technique looks like. We’ll also cover basic movement around the court so your players can start putting skills into action during game play. Click one of the skills below to get started!
How to pass a volleyball
Passing is the foundation of every successful play in volleyball. It’s the first contact after the serve and sets up the rest of the rally. For beginners, learning how to create a strong, steady platform and control the ball with their forearms is essential. The goal is to send the ball accurately to the setter. Below, we’ll walk you through how to teach the basics of how to pass a volleyball step-by-step.

- Setup:
- Stand with feet shoulder-width apart, knees bent, and weight slightly forward on the balls of your feet.
- Arms are out in front with hands together, thumbs side-by-side and pointing down to create a flat platform.
- Keep your elbows straight and shoulders forward — the ball should contact your forearms, not your hands.
- Stay low and balanced, ready to move.
- Contact:
- Let the ball come to your platform (don’t swing).
- The ball should contact your forearms between the wrists and elbows. This “sweet spot” gives you the most control.
- Angle your platform to direct the ball toward the setter.
- Use your legs and body to guide the ball upward, finishing in a balanced position with your platform facing your target.
- Cue words:
- “Platform out”
- “Arms straight”
- “Thumbs together”
- “Angle to target”
- “Use your legs”
- “Freeze the finish”
How passing should look:
How to teach volleyball passing:
How to serve a volleyball
Serving is how every rally begins, and it’s a skill every player should master. For beginners, the underhand serve is a great place to start. It’s easier to control and helps players build confidence as they learn proper technique. As players improve, they can progress to the overhand serve, which allows for more power and control. Both types of serves are effective at the beginner level, and the key is consistency. Below, we’ll show you how to serve a volleyball underhand and how to overhand serve step‑by‑step.
Teaching the underhand volleyball serve

- Setup:
- Start with the non-dominant foot forward (right-handers start with their left foot forward) and feet shoulder-width apart, knees slightly bent in a relaxed athletic stance.
- Hold the ball in your non-dominant hand at belly button height, arm extended but relaxed. Keep this arm holding the ball still—this is your "target."
- Make a fist with your hitting hand, thumb on the outside, and swing your arm back like a pendulum, keeping it straight and relaxed.
- Contact:
- Take a small step with your front foot as you swing your arm forward in a straight line.
- Contact the ball just below center with the flat part or heel of your closed fist.
- Swing through the ball toward the target.
- Cue words:
- "Step, swing"
- "Hold it still"
- "Swing straight"
- "Hit with the heel"
- "Follow through"
How an underhand serve should look:
How to teach an underhand volleyball serve:
Teaching the overhand volleyball serve (Standing float serve)

Before teaching the mechanics, it’s important to understand what a float serve is:
What is a float serve?
A volleyball float serve is an overhand serve that does not spin. Because there’s no spin, the ball moves unpredictably through the air, “floating” or wobbling slightly as it travels over the net. This can make it difficult for the receiving team to pass consistently, even if the serve isn’t very powerful.
- Setup:
- Stand behind the end line, facing the target zone.
- Feet shoulder-width apart with a slight stagger (non-dominant foot forward).
- Hold the ball in the non-dominant hand at about shoulder height, elbow slightly bent.
- Serving arm is pulled back in a bow-and-arrow position, elbow high, palm open.
- Contact:
- Lift/toss the ball straight up about 12–18 inches in front of the hitting shoulder with no spin.
- Shift your weight onto your front foot and swing your hitting arm straight toward the ball, contacting the middle of the ball with a firm, open hand (do not snap the wrist).
- Follow through should be short or freeze at contact (don’t wrap the arm across the body).
- Cue words:
- “Toss straight and slow”
- “Flat hand, firm wrist”
- “Hit the middle of the ball”
- “Freeze on contact”
- “Step, swing, freeze”
How a standing float serve should look:
The basics of how to teach the volleyball float serve:
How to set a volleyball
Setting is the second contact in a typical volleyball rally. A good set gives the hitter the best chance to score, making it one of the most important skills to develop early. For beginners, the focus is on hand positioning, body control, and making a clean, accurate delivery to a target. While advanced setting involves movement and decision‑making, the basics start with simple reps that build touch and confidence. Below, we’ll show you how to teach the fundamentals of setting step‑by‑step.

- Setup:
- Stand with feet shoulder-width apart, right foot slightly forward, knees slightly bent, and weight balanced on the balls of your feet.
- Hold your hands up in front of your forehead, forming a triangle or “window” with your thumbs and index fingers.
- Fingers should be spread wide and relaxed, elbows bent and pointing slightly out.
- Contact:
- As the ball approaches, absorb it with soft hands — contact should happen on the pads of your fingers, not the palms.
- Bend your knees slightly and extend your arms and legs together as you push the ball up and out toward your target.
- Finish with fully extended arms and flat hands extended towards the target.
- Cue words:
- “Right foot forward”
- “Window up”
- “Catch it in the wedge”
- “Push to the sky”
- “Use your wrists, not your elbows”
How setting should look:
How to teach setting:
How to hit a volleyball
Attacking, also called hitting, is how players score. For beginner players, learning to hit starts with understanding footwork, arm swing mechanics, and timing. Before jumping into full approaches, players should first get comfortable with arm motion and controlled contact. As they build coordination and confidence, they can progress to more dynamic hitting. Below, we’ll walk you through how to teach the fundamentals of attacking step‑by‑step.

- Setup:
- Stand in a balanced position with knees slightly bent and weight on the balls of your feet.
- Begin with arms down and relaxed, preparing to swing in rhythm with your steps.
- Approach:
- Start with a 3-step approach:
- Left-Right-Left for right-handers
- Right, Left, Right for left-handers
- The first step should be the shortest; the last two steps should be long, quick and explosive.
- As you take your final two steps, swing both arms back, then drive them up as you jump.
- Start with a 3-step approach:
- Contact:
- In the air, bring your hitting arm back in a “bow and arrow” shape with your hitting elbow high and your hand by your ear. Your non-hitting arm should be pointing towards the ball.
- Contact the ball with a fast, open, relaxed hand (arm should be fully extended).
- Snap your wrist and follow through down across your body.
- Cue words:
- “Arms back, arms up”
- “Bow and arrow”
- “High contact”
- “Fast arm”
- “Snap and follow through”
How attacking should look:
How to teach attacking:
How to dig a volleyball
Digging is the defensive skill used to keep the ball off the floor after an opponent’s attack and is a key part of volleyball defense. For beginners, the focus is on learning proper body position, platform control, and how to react quickly while staying low and balanced. Early digging drills emphasize posture, platform angle, and tracking the ball with the eyes. As players gain confidence, they can start digging harder-driven balls and learning to move more effectively. Below, we’ll show you how to teach the basics of digging step-by-step.

- Setup:
- Start in a low, athletic stance with knees bent, feet shoulder-width apart, and weight slightly forward.
- Keep your arms out in front and your platform ready. Shoulders should be slightly forward, with your chest over your knees and knees over your toes.
- Stay relaxed and balanced, ready to move in any direction.
- Contact:
- Put your platform together and angle it toward the target (the setter or middle of the court).
- Let the ball come to your platform — don’t swing at it.
- For balls outside your body, step or shuffle toward the ball while keeping shoulders and platform angled toward the target.
- Cue words:
- “Low and ready”
- “Platform out”
- “Angle to target”
- “Move your feet”
- “Freeze the finish”
How digging should look:
How to teach digging:
Volleyball blocking
Blocking is the first line of volleyball defense against an opponent’s attack. For beginners, the goal is not necessarily to stop the ball, but to learn good positioning, timing, and movement along the net. Early blocking instruction should emphasize balance, hand positioning, jumping straight up and penetrating their hands across the net. Even if players don’t touch the ball, a blocking presence helps the defense by taking away angles and making hitters adjust. Below, we’ll show you how to teach the basics of how to block a volleyball step-by-step.

- Setup:
- Start in a balanced stance at the net: feet shoulder-width apart, knees slightly bent.
- Hands are up in front of your face or shoulders, palms facing the net, elbows bent and relaxed.
- Contact:
- When the hitter jumps to attack, jump straight up with both hands, keeping shoulders square to the net.
- Reach high with strong arms and press your hands over the net with fingers spread wide and thumbs rotated up.
- Land on two feet, returning to a balanced stance.
- Cue words:
- “Hands up”
- “Press over”
- “Big hands, wide fingers”
- “Seal the net”
How blocking should look:
How to teach blocking:
Movement
Good volleyball isn’t just about skills—it’s about movement. Beginners often want to reach for the ball with their arms, but great players learn early that their feet come first. Helping players move to the ball, stay balanced, and be ready for the next play is one of the most important habits you can teach. Players should stay on their toes, keep a slight bend in their knees, and move their feet so their body is facing the ball. Think of movement like a dance—feet are always active, posture stays athletic, and players are ready to react in any direction. The videos below show simple, effective ways to teach this concept and help players become more confident, quicker, and more comfortable chasing down the ball.
Foot movement during a rally:
10 toes drill:
5. Learn a system for offense and serve receive
A volleyball offense system is how your team organizes who passes, sets, and attacks the ball in each rotation. (A rotation simply refers to the starting positions of the six players on the court at the moment the ball is served.) At the beginner level, your goal for volleyball offence is simple:
- Know where to line up on volleyball serve receive in each rotation
- Pass the ball to the setter
- Set the ball to a hitter
Offensive systems are named based on how many hitters and setters are on the court. For example, a 4-2 offensive system means you have four hitters and two setters. A 5-1 means five hitters and one setter. The numbers simply describe the roles on the court.
There is no single "right" or "best" system. The best choice depends on your players’ skill level, confidence, and experience. Below we'll walk through four common offensive systems and show simple volleyball serve receive formations by rotation so you can see how everything fits together. Remember, rotations are named based on where the setter starts the rally. Rotation 1 is when the setter is in Zone 1 (right back), Rotation 2 is when the setter is in Zone 6 (middle back), and so on as the team rotates clockwise.
In any serve receive formation, players must follow volleyball overlap rules, meaning they must be standing in the correct relationship to their teammates before the serve.
To learn more, you can watch a video about different serve receive formations for 3 players and download a volleyball serve receive formation worksheet.
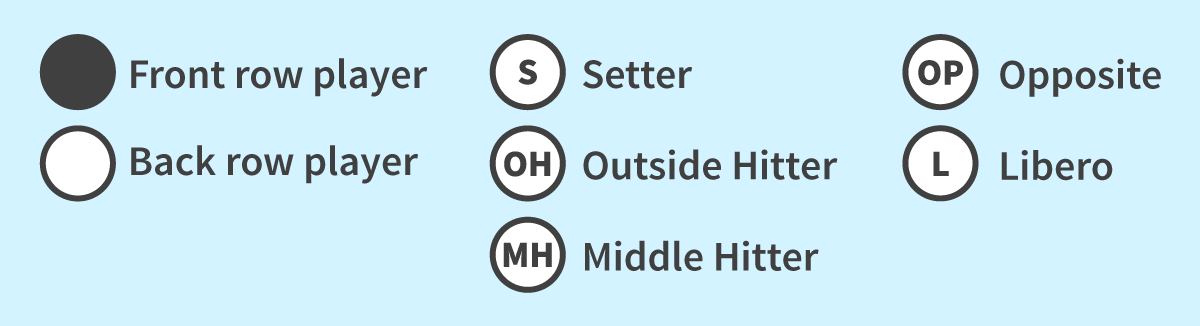
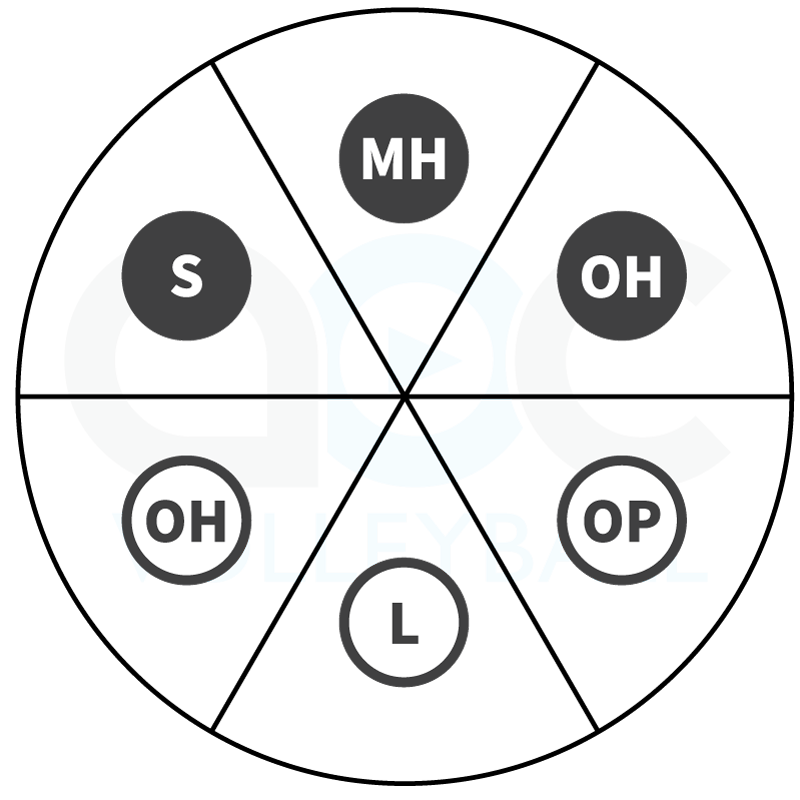
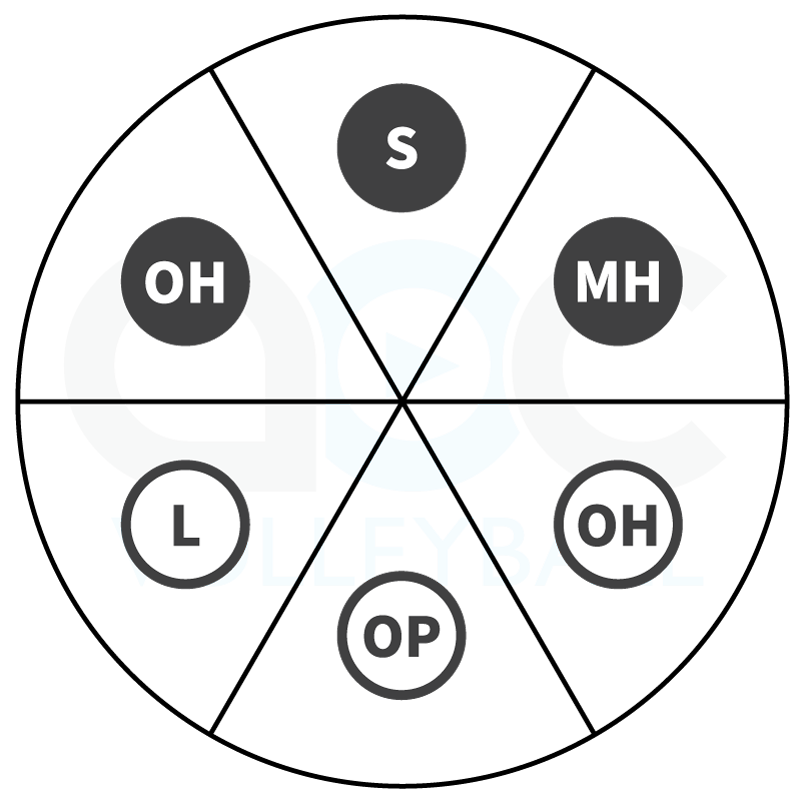
Use the key below to understand the symbols used in the diagrams throughout this section.
6-6 offensive system
Overview: In a 6-6 volleyball offense, every player is a setter and a hitter. Whoever rotates into right front sets the ball. When they are not setting, they are a hitter. This is often the simplest system for very young or brand-new teams who are still learning basic skills and rotations.
Advantages:
- Very simple and easy to teach.
- Every player learns to set.
- Great for teaching rotations and basic court awareness.
Disadvantages:
- Limited offensive variety.
- Less emphasis on developing a specialized setter role.
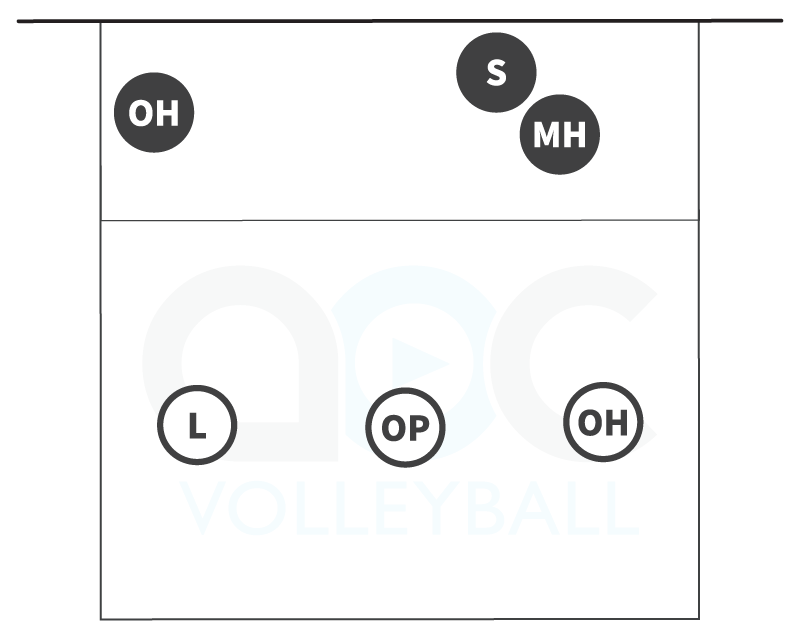
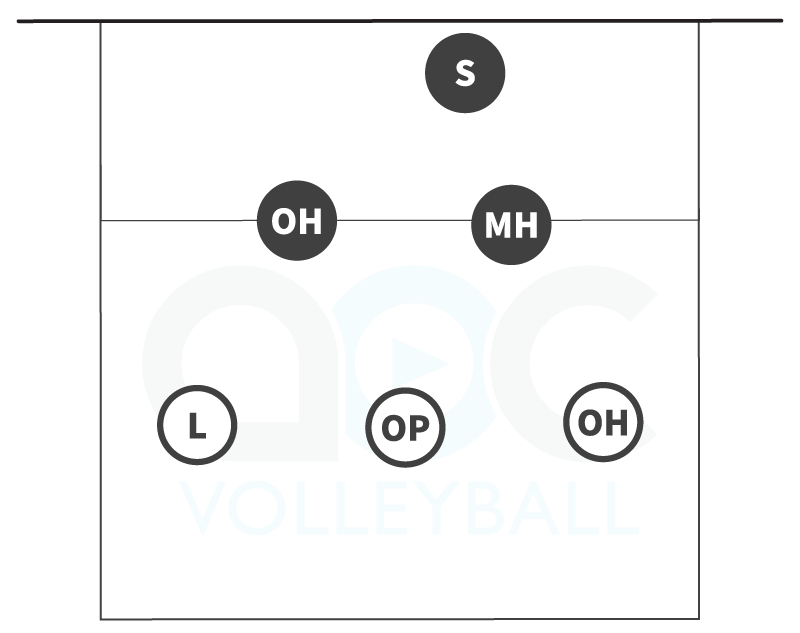
Serve receive in a 6-6
Because the setter is whoever rotates into right front in this system, serve receive looks the same in every rotation. Below is a simple 5-person volleyball serve receive formation that can be used across all rotations.
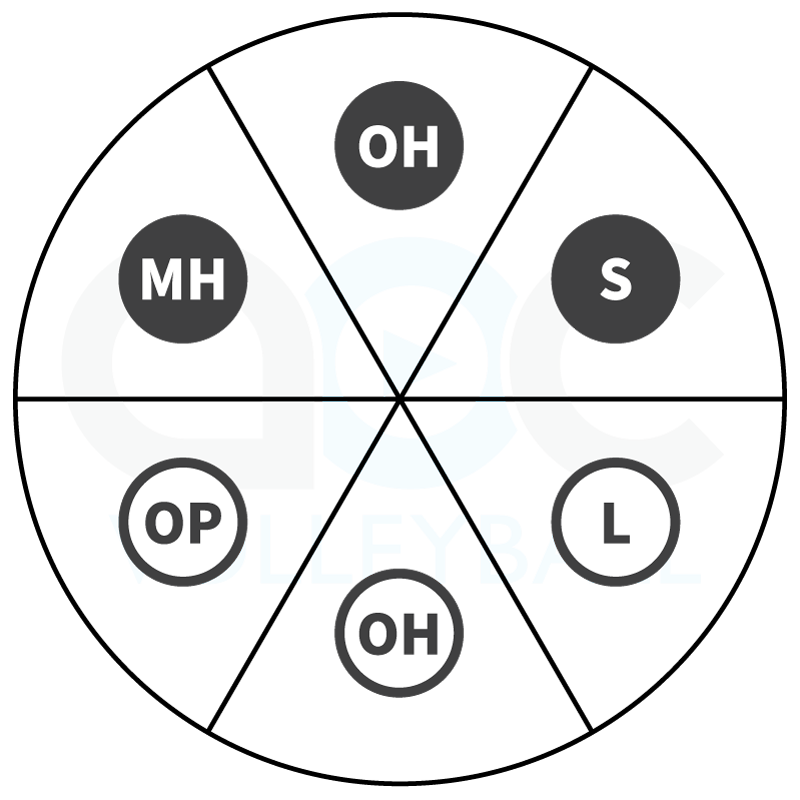
4-2 offensive system
Overview: A 4-2 volleyball offense uses two setters who set only when they are in the front row. That means you will always have two front row hitters and one front row setter. This is one of the best systems for new middle school or rec teams because it keeps things simple and consistent.
Advantages:
- Easy to organize and understand.
- Setters always set from the same spot and set the same hitters, building consistency.
- Simple serve receive patterns.
Disadvantages:
- Only two front row hitters at a time.
- Setter blocks out of the middle, which may not be ideal defensively.
How to run a 4-2
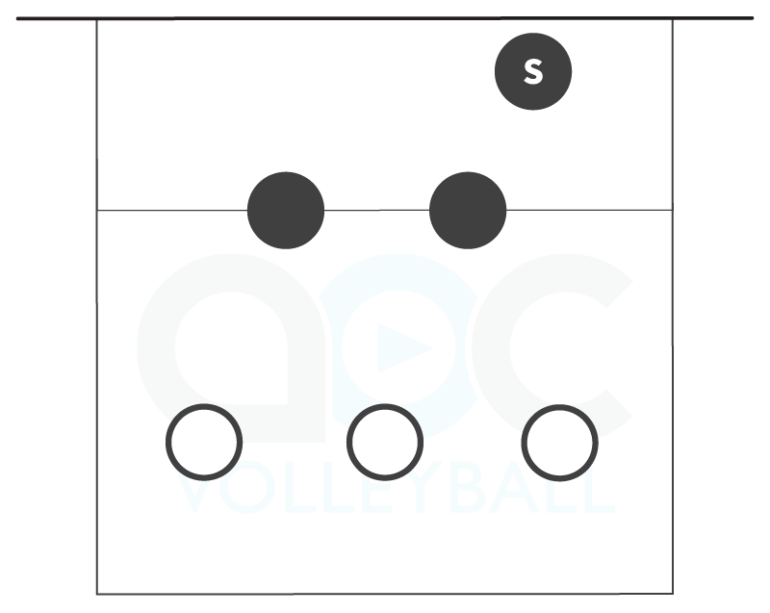
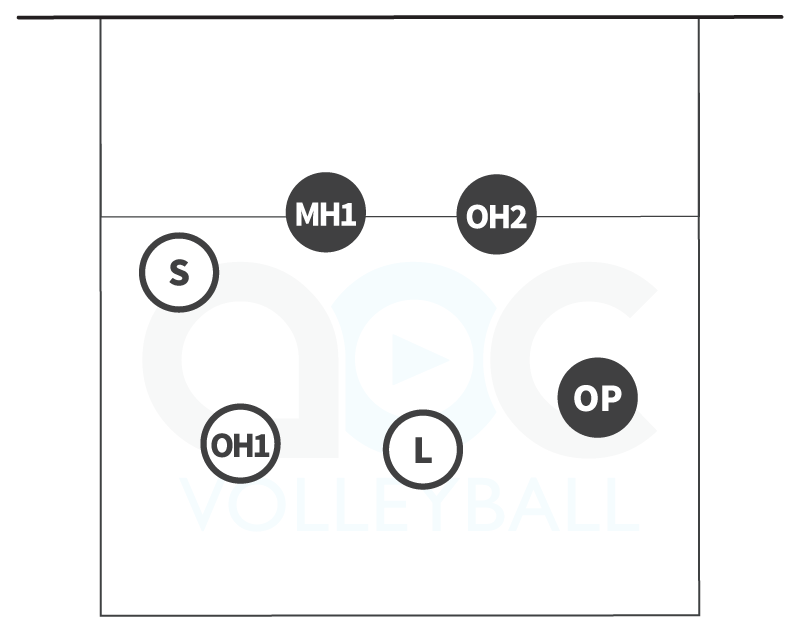
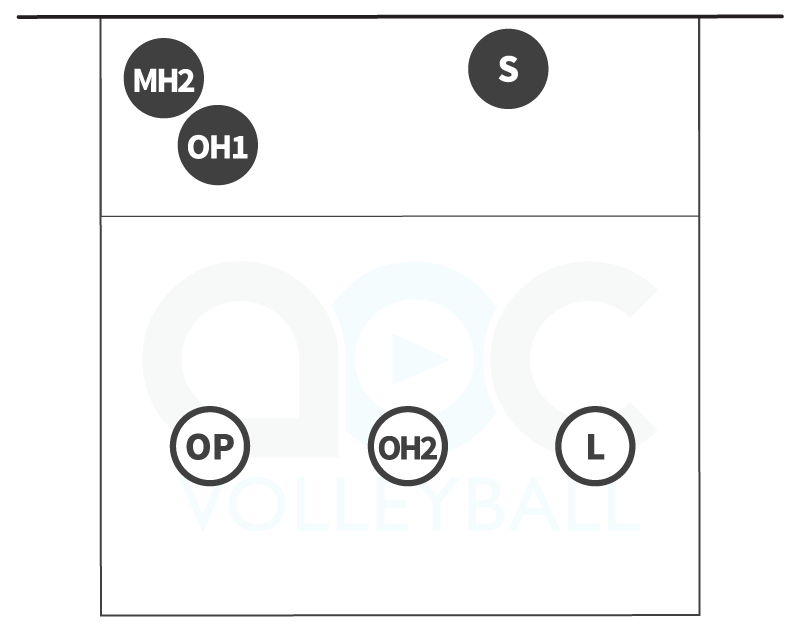
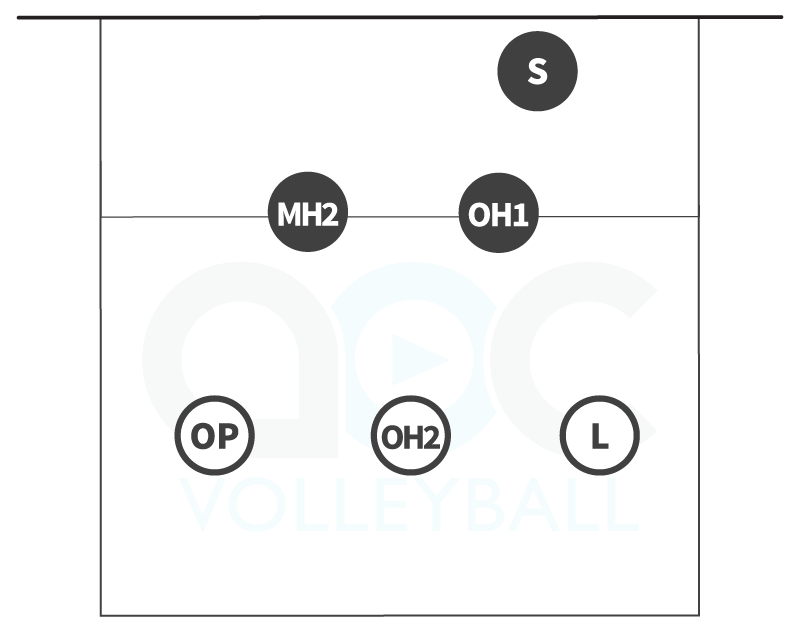
Serve receive in a 4-2
Because the setter is always in the front row in this system, some rotations look the same (1&4, 2&5, 3&6), so you only need to learn three basic serve receive patterns.
Below, you'll see two recommended options for each rotation: a standard 3-person serve receive and a simple 5-person option. The 3-person formation is most common at nearly all levels and requires passers to cover more court. The 5-person formation can be used with young or beginning teams who are still developing court movement, adding extra passers so each player has less area to cover.
As you review the diagrams, focus on volleyball overlap rules and helping players clearly understand their area of responsibility.
Rotations 1 & 4
(Setter in left front)
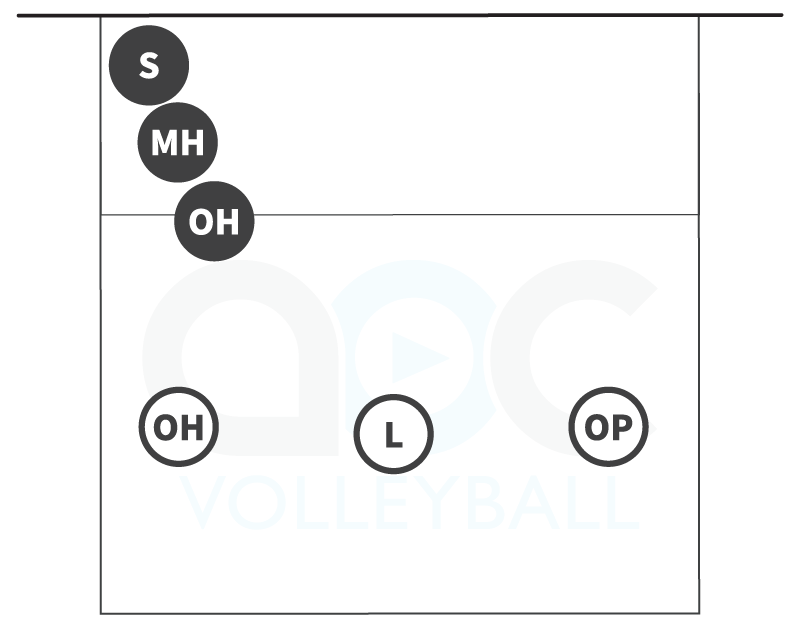
3-person
5-person
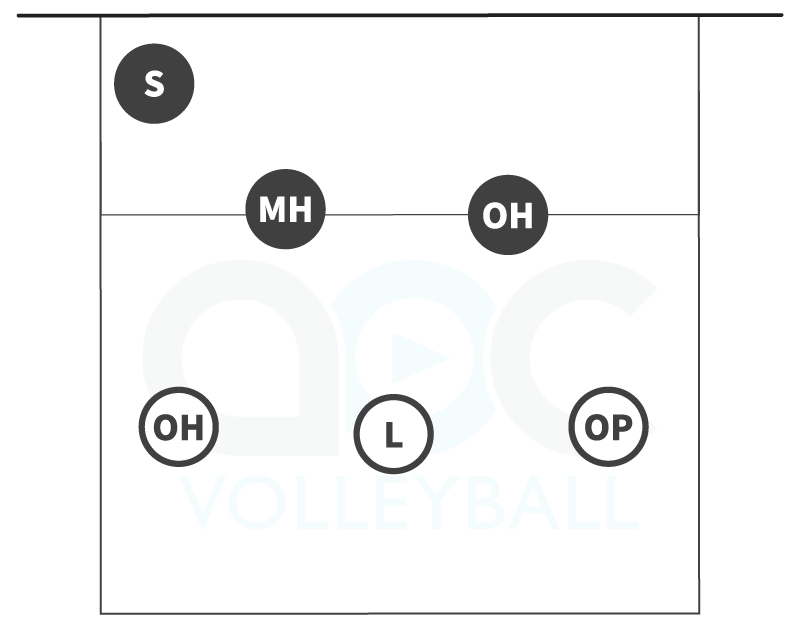
Rotations 2 & 5
(Setter in middle front)
3-person
5-person
Rotations 3 & 6
(Setter in right front)
3-person
5-person
6-2 offensive system
Overview: A 6-2 volleyball offense uses two setters who set only when they are in the back row. When a setter rotates to the front row, they become a hitter (an Opposite or Right Side hitter) and the other setter (now in the back row) takes over setting. This means you will always have three front-row hitters available to attack. This system works well for teams that have two capable setters and are ready for a little more coordination and movement.
Advantages:
- Always three front row attackers for more offensive options.
- Allows flexibility in lineup and substitution.
- Can utilize your best hitter as a setter when needed.
- Helps develop two players as setters.
Disadvantages:
- Requires two players who can set consistently.
- More movement and communication.
- Hitters must adjust to two different setters.
How to run a 6-2
Serve receive in a 6-2
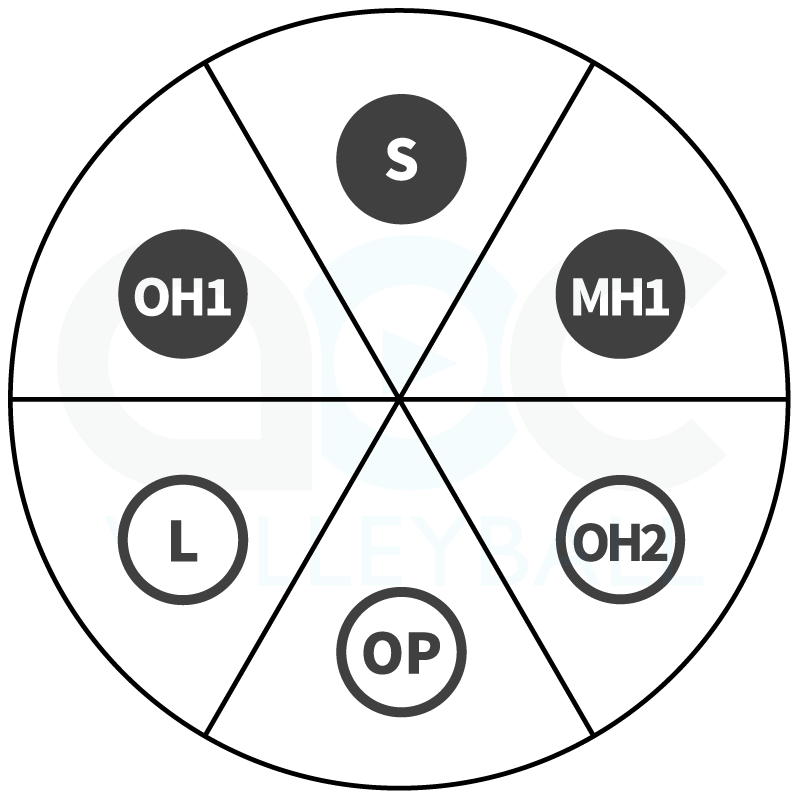
The setter will always be in the back row in this system, so you need to pay careful attention to where they are lined up on serve receive. Just like the 4-2, some rotations mirror each other (1&4, 2&5, 3&6), so you only need to learn three basic serve receive patterns.
Below, you'll see two recommended options for each rotation: a standard 3-person serve receive and a simple 5-person option. The 3-person formation is most common at nearly all levels and requires passers to cover more court. The 5-person formation can be used with young or beginning teams who are still developing court movement, adding extra passers so each player has less area to cover.
As you review the diagrams, focus on giving the setter a clear path to the net, following volleyball overlap rules, and making sure players understand their passing responsibilities.
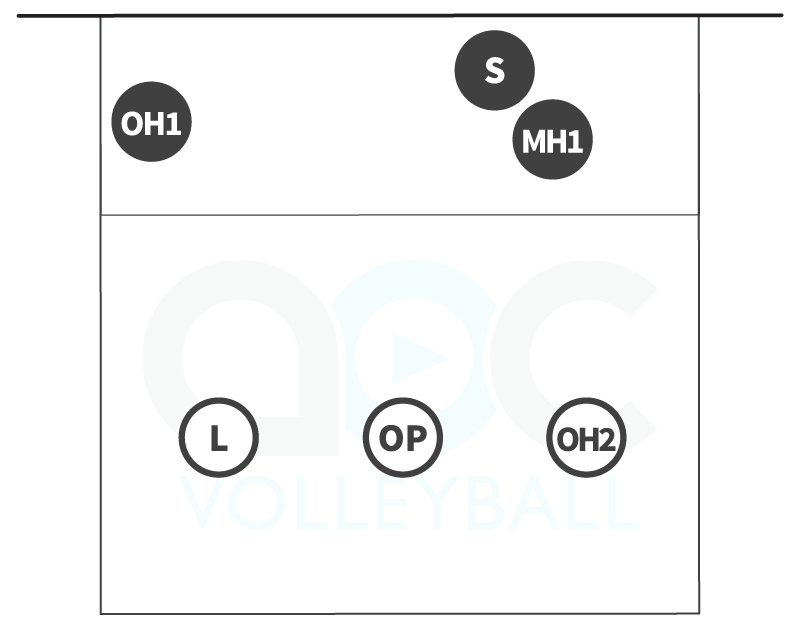
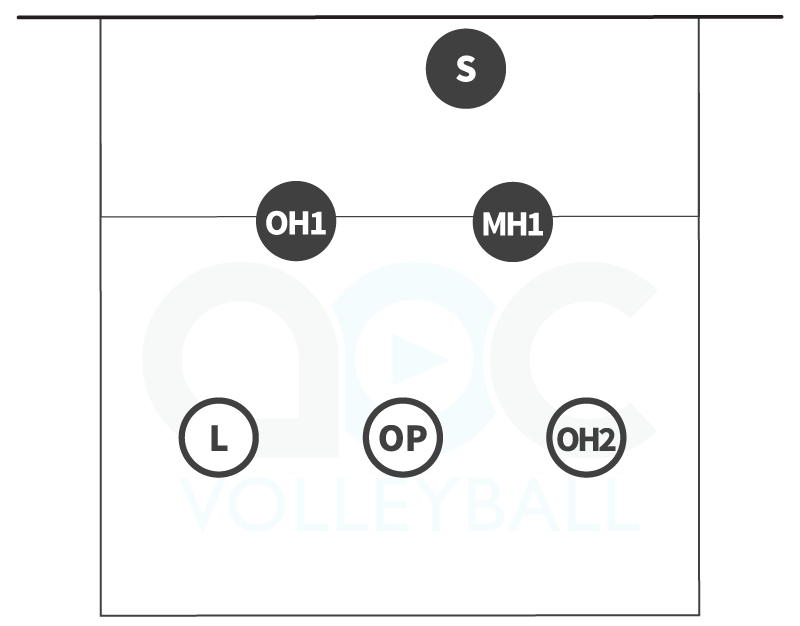
Rotations 1 & 4
(Setter in right back)
3-person
5-person
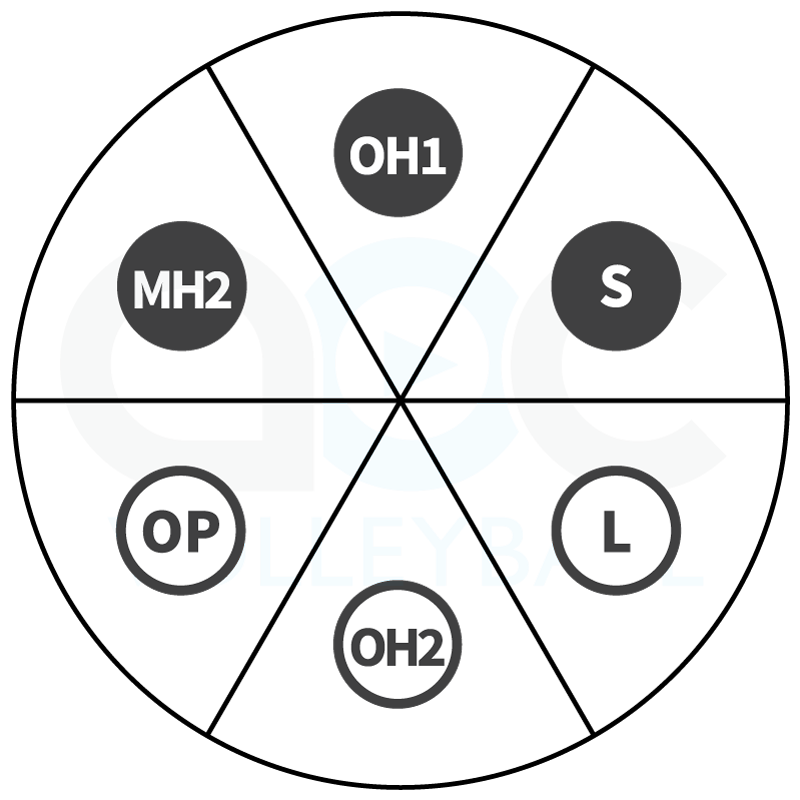
Rotations 2 & 5
(Setter in middle back)

3-person
5-person
Rotations 3 & 6
(Setter in left back)
3-person
5-person
5-1 offensive system
Overview: A 5-1 volleyball offense has one primary setter who sets in all six rotations. That setter rotates through the front and back row just like every other player, but remains the team’s setter no matter where they are. When the setter is in the back row, you have three front-row hitters. When the setter is in the front row, you have two front-row hitters and the setter is also a blocker. This system is common at the high school level and above, but can work for lower level teams if you have one athlete ready to take on the setting role full-time.
Advantages:
- Consistent setting throughout the match.
- Builds strong setter-hitter chemistry.
Disadvantages:
- Requires one athlete to handle all setting responsibilities.
- When the setter is front row, there are only two front-row hitters.
- Setter must defend and block effectively when in the front row.
How to run a 5-1
Serve receive in a 5-1
Because the setter stays the same player whether they are in the front row or back row, serve receive looks different in every rotation.
Below, you'll see two recommended options for each rotation: a standard 3-person serve receive and a simple 5-person option. The 3-person formation is most common at nearly all levels and requires passers to cover more court. The 5-person formation can be used with young or beginning teams who are still developing court movement, adding extra passers so each player has less area to cover.
As you review the diagrams, focus on volleyball overlap rules and helping players clearly understand their area of responsibility.
Rotation 1
(Setter in right back)
3-person
5-person
Rotation 2

3-person

5-person
Rotation 3
3-person
5-person
Rotation 4
3-person
5-person
Rotation 5
3-person
5-person
Rotation 6
3-person
5-person
Basic volleyball sets for beginning teams
Once your team understands rotations and serve receive, the next step is getting the ball to your hitters so you can score! For beginning teams, focus on having your setters deliver a high ball to each hitter. These basic volleyball sets keep things simple and give your setter clear, easy‑to‑run options while helping hitters learn their approach and timing.
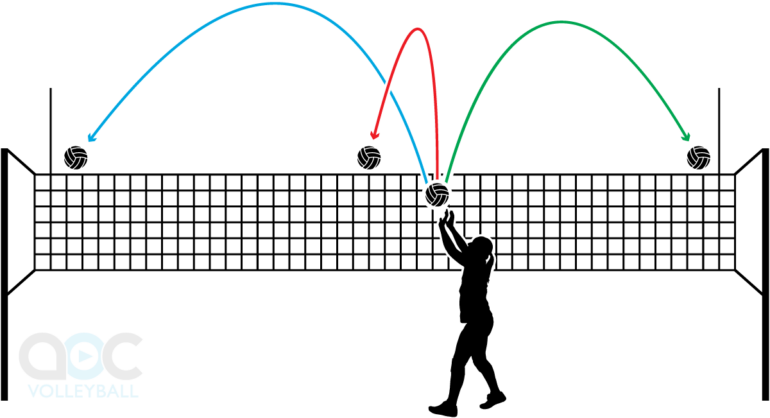
Here's what each of those volleyball sets looks like:
Outside set
High middle set
Back set
If you'd like to explore more sets, check out our glossary of front sets, back sets, and combination sets.
6. Learn a system for volleyball defense
Volleyball team defense is about organization, anticipation, and decision-making. No defensive system can take away every possible attack, so the goal is to play the odds, deciding what your team wants to defend first and what you’re willing to give up.
For beginner teams, volleyball defense should be simple and predictable. As teams improve, defensive systems become more structured, especially as blocking improves and attackers become more consistent. In this section, you’ll learn how defensive positioning works, how players move before the ball is attacked, and a few common defensive systems, starting with the simplest option and progressing to more advanced ones.
Use the key below to understand the symbols used in the diagrams throughout this section.

Base position vs. adjust position
(Defensive movement)
Good volleyball defense starts before the attacker swings. Players begin in a base position based on where the ball is most likely to be attacked first, then move to an adjusted position as the play develops.
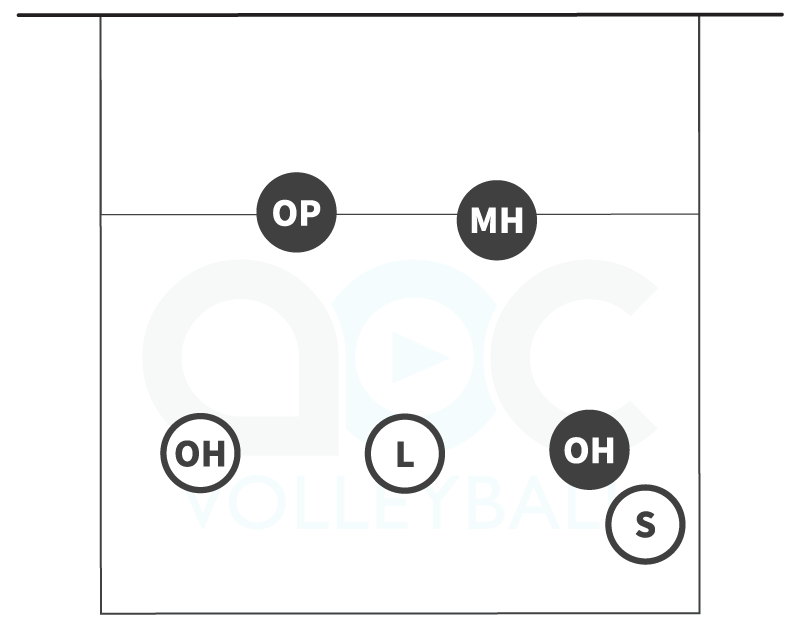
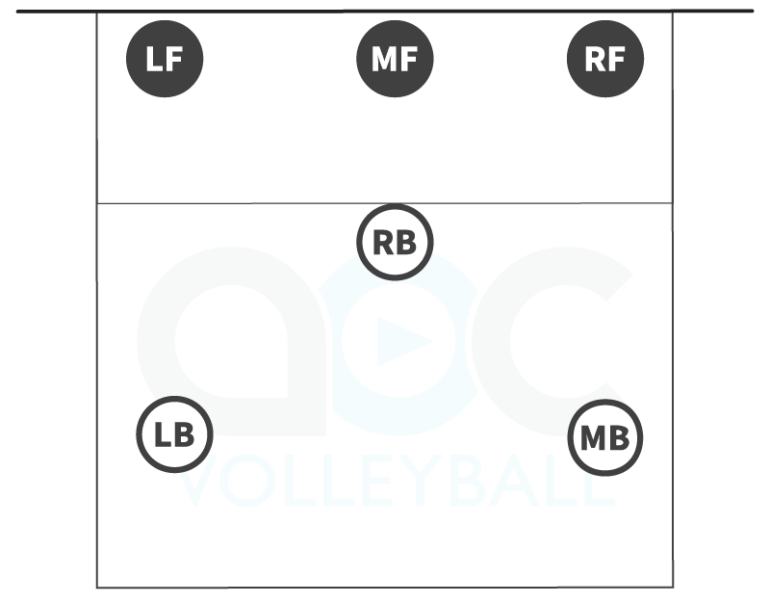
The following diagram shows a standard base position used in many volleyball defensive systems.
Key teaching points:
- Base position is where you defend the first likely attack (quick, front-row setter, or free ball).
- Adjusted position defends the next most likely option (often a high outside set).
- Players should move early, based on what they see—pass location, setter position, and available attackers.
- Especially at younger levels, many “attacks” are free balls, so defenders should be placed where the ball is most likely to go.
- Defensive positions are areas, not fixed spots—players must adjust every play.
Video on base to adjust movement:
Organizing your volleyball defense after the serve
When your team serves, players must begin the rally in their correct rotational order. This simply means they must line up in the proper spots so they are not overlapping illegally. However, those starting spots are not where they have to play defense.
As soon as the server contacts the ball, players can move from their rotational starting positions into their defensive base positions. This movement should be quick, organized, and practiced so it becomes automatic.
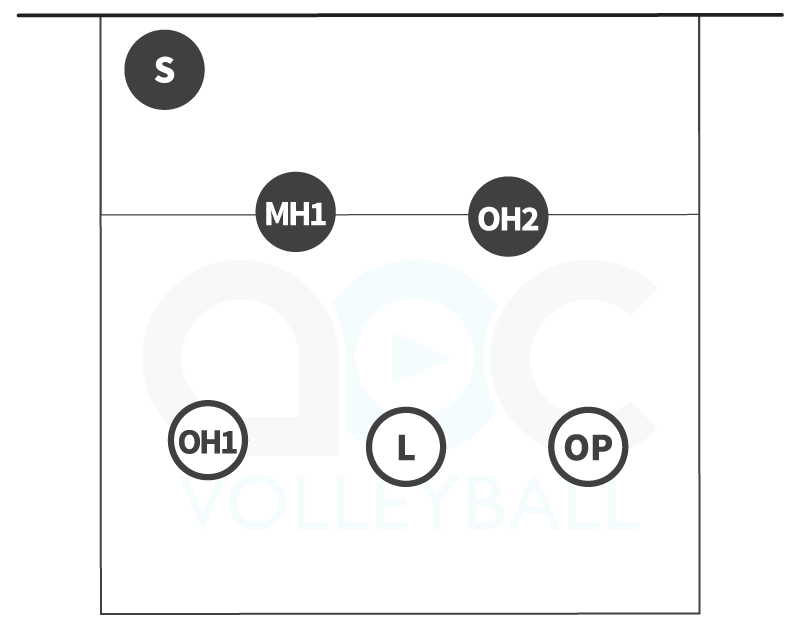
Each of the volleyball positions typically attacks and defends in a consistent area of the court, which helps players know exactly where to go after the serve. In the front row, outside hitters usually play on the left side, middle hitters play in the middle, and opposite hitters or setters play on the right. In the back row, those same players transition to their defensive "home spots": outside hitters typically defend in middle back, the libero usually plays left back, and the setter or opposite defends in right back.
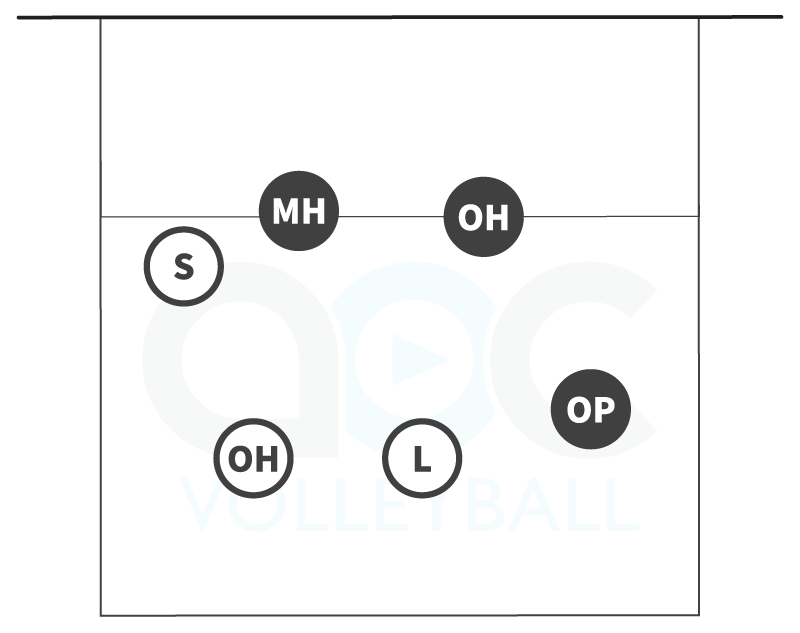
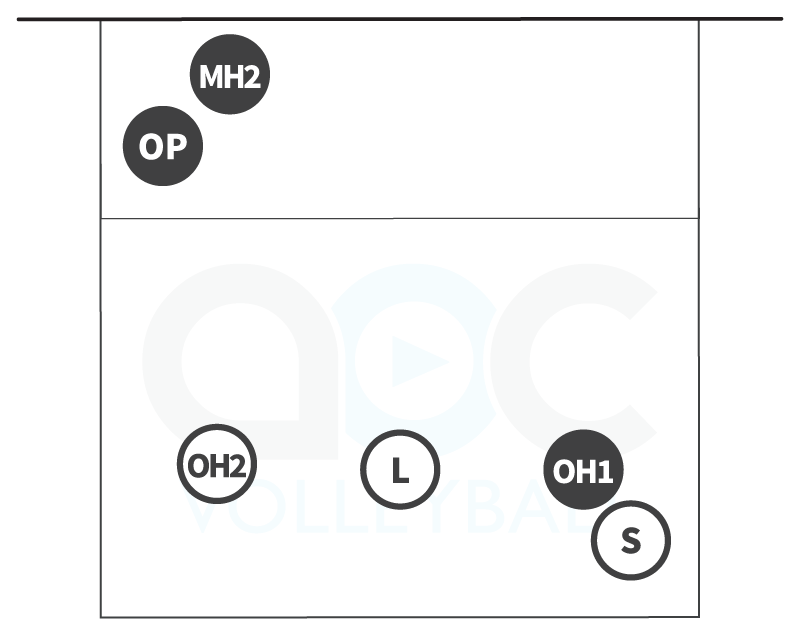
Teaching players that they have “home spots” in both the front and back row makes serve-to-defense transitions much more organized and easier to understand. Front row players move into their blocking base positions at the net, while back row players spread into their defensive base behind the block. This transition happens on every serve. The more clearly defined the “home spots” are, the smoother and faster this movement becomes.
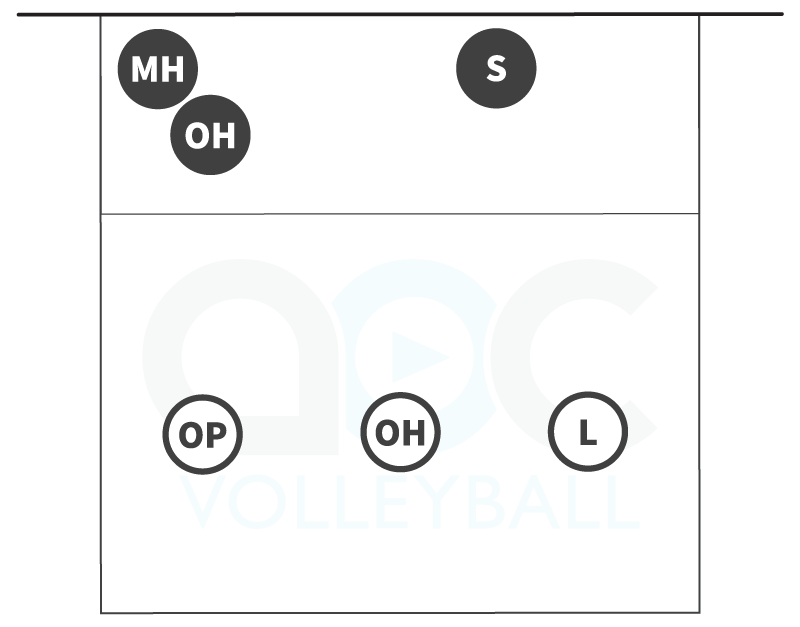
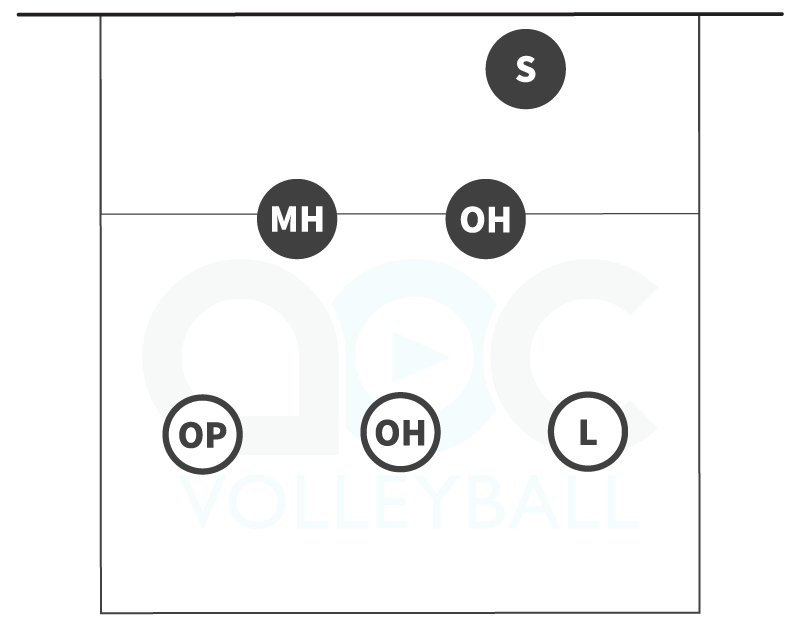
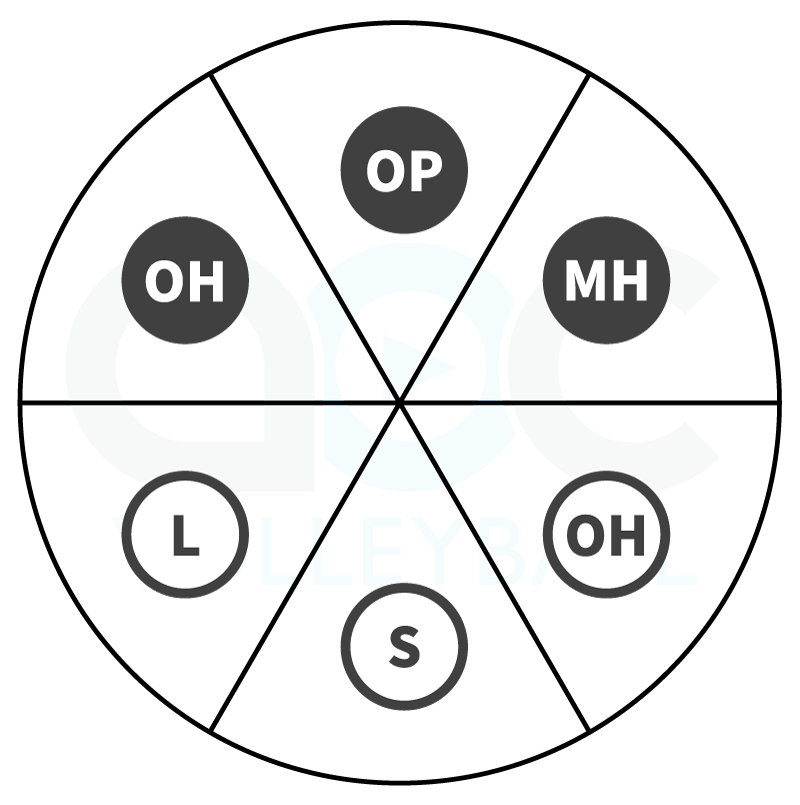
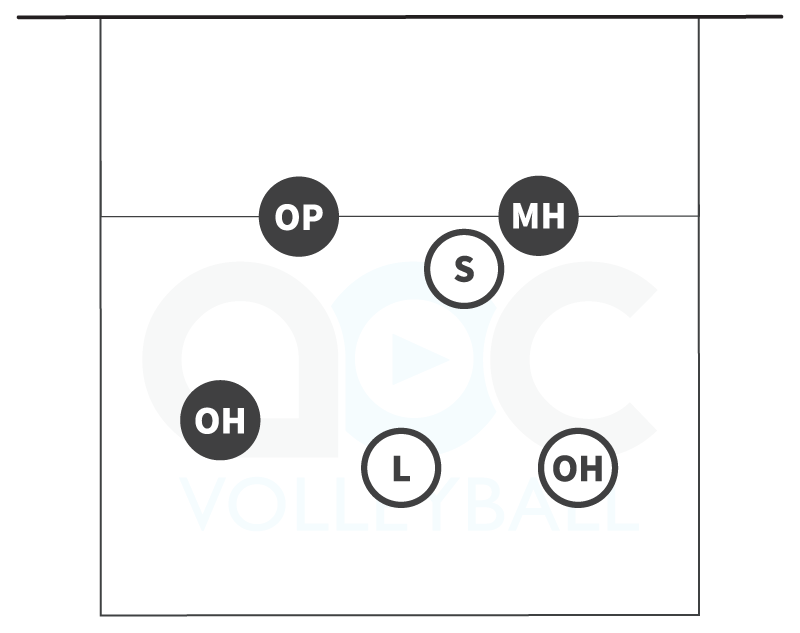
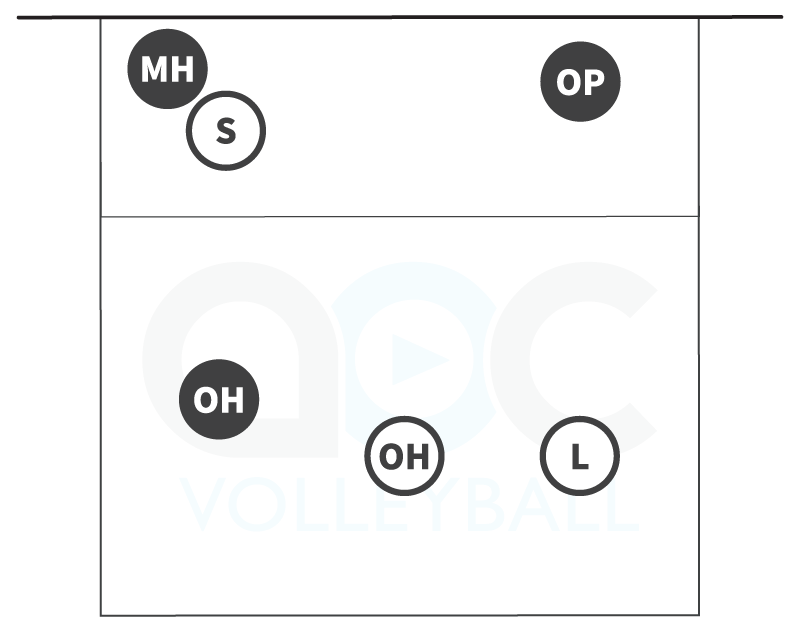
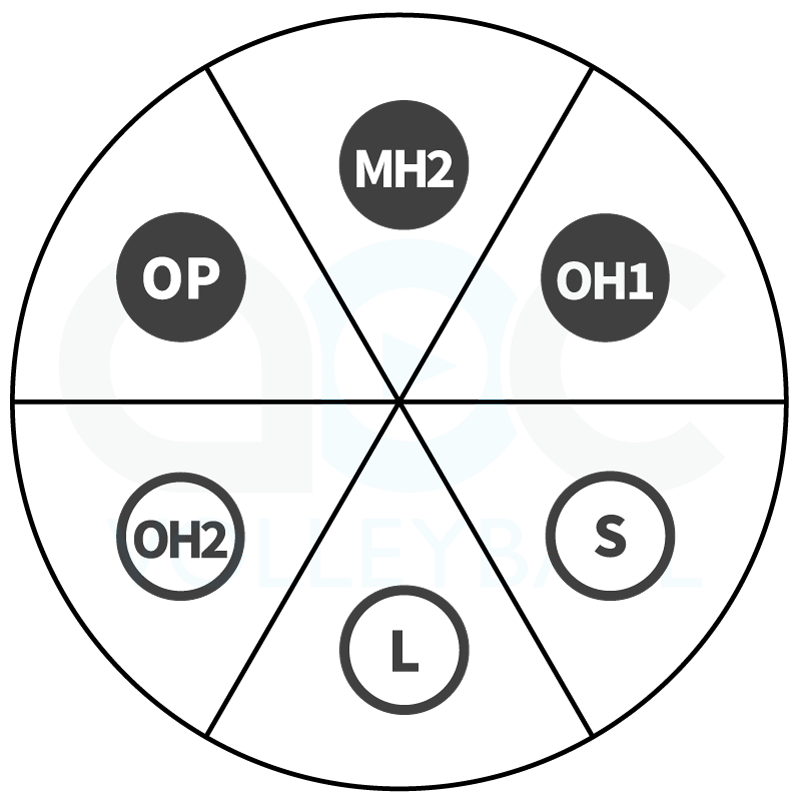
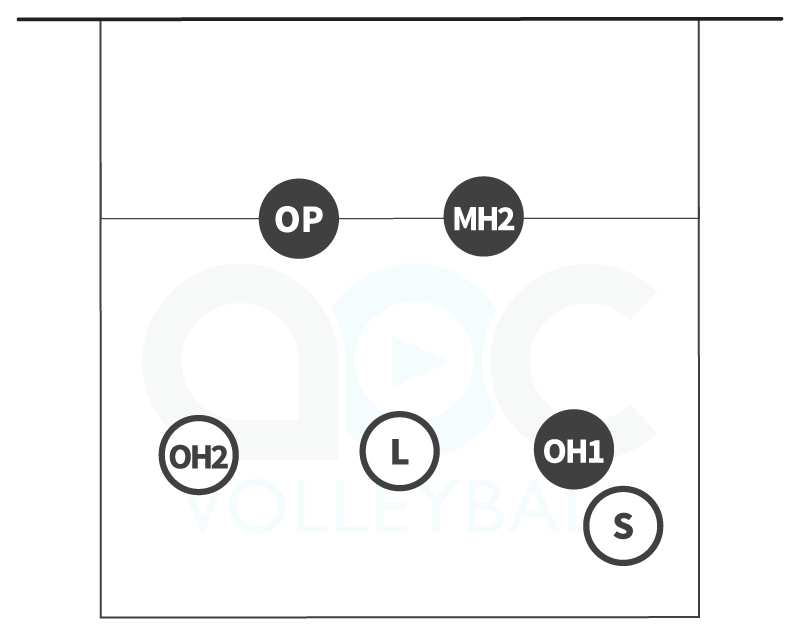
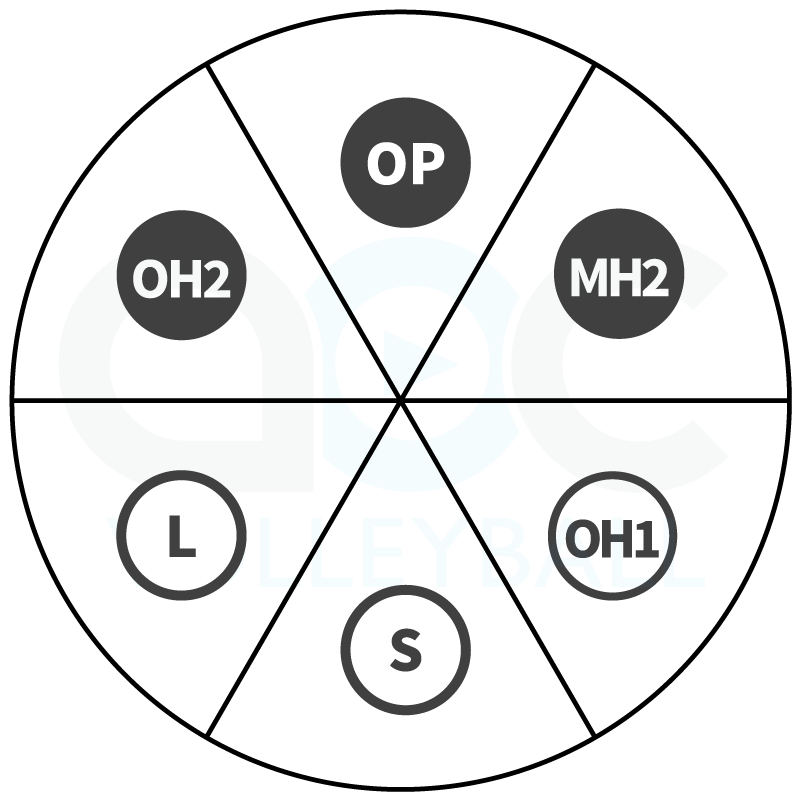
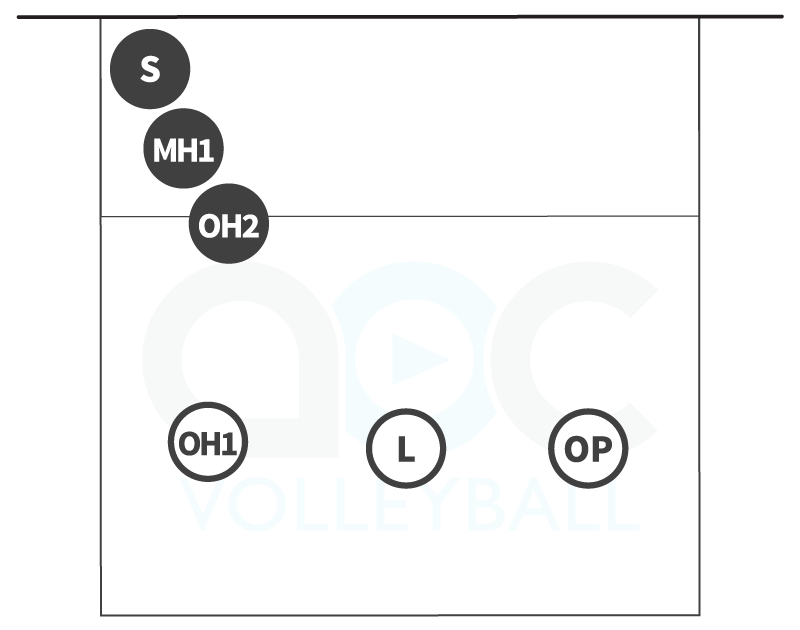
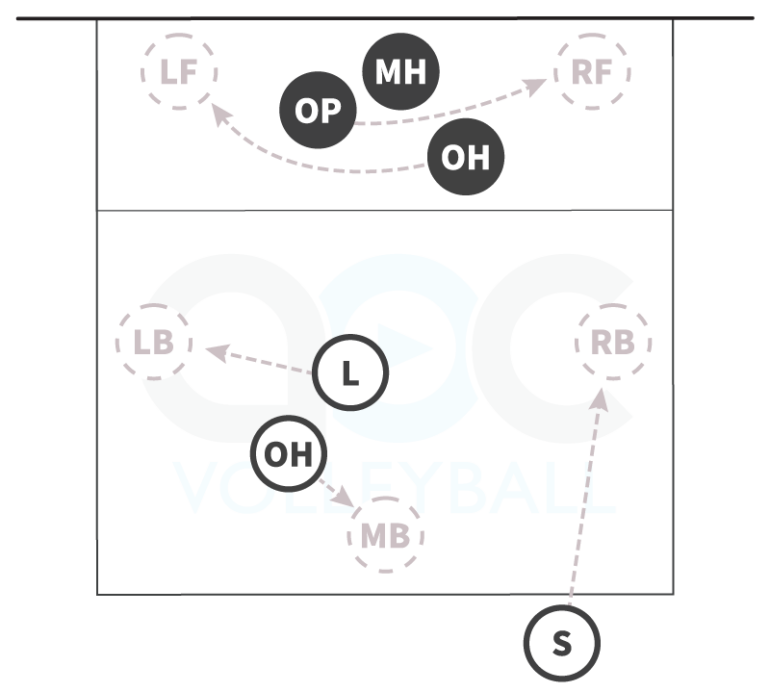
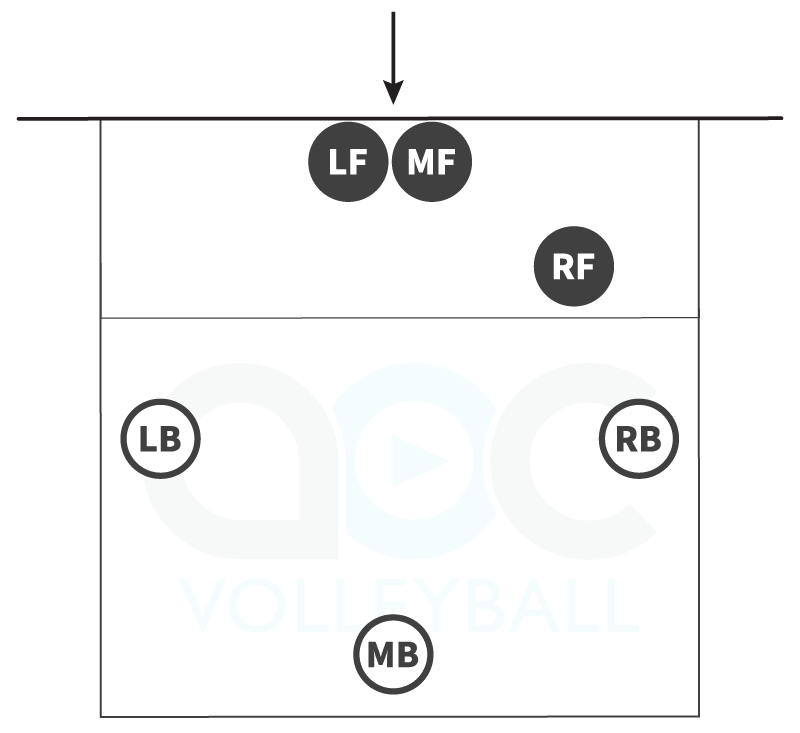
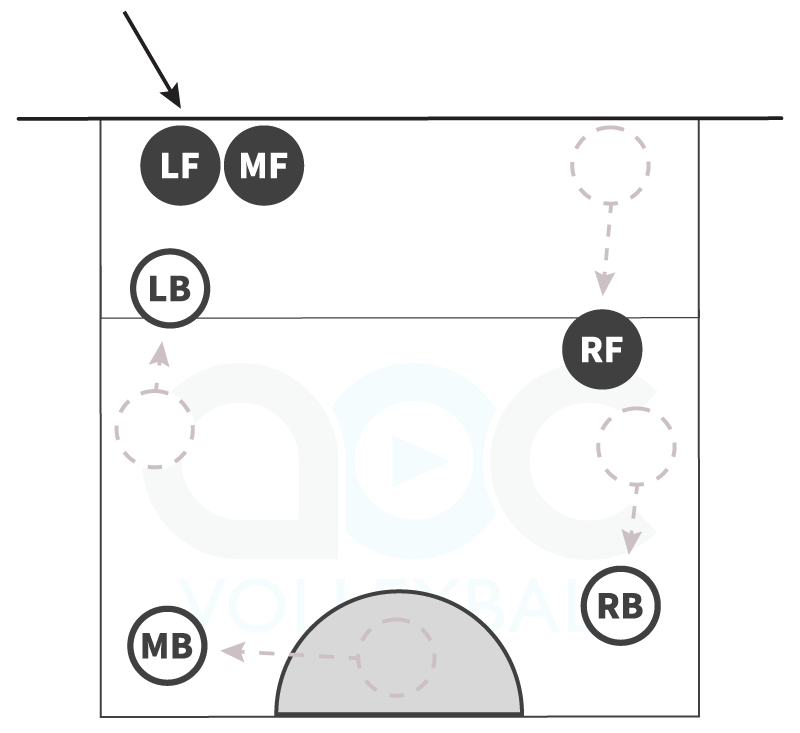
The diagram below shows an example of players starting in rotational order in Rotation 1 and then switching to their defensive base positions once the serve is contacted.
Rotational order
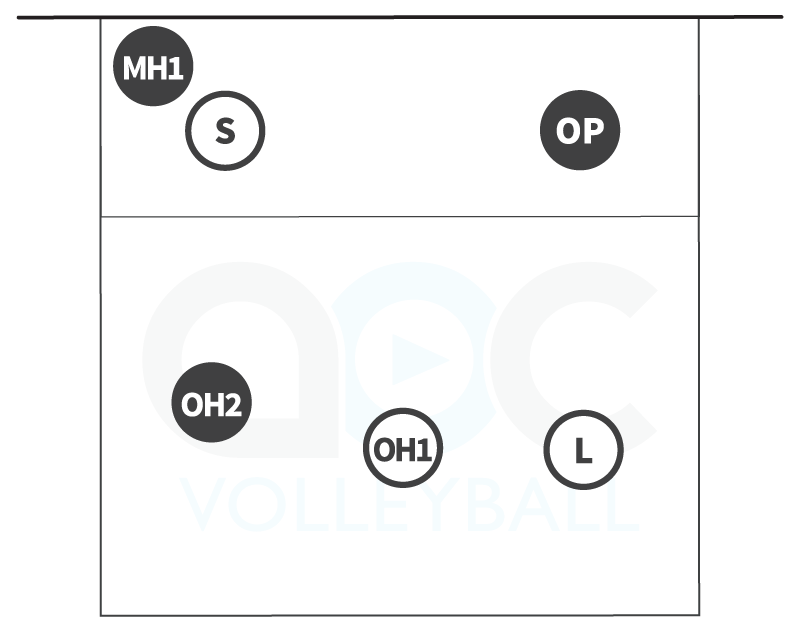
Transitioning to defense
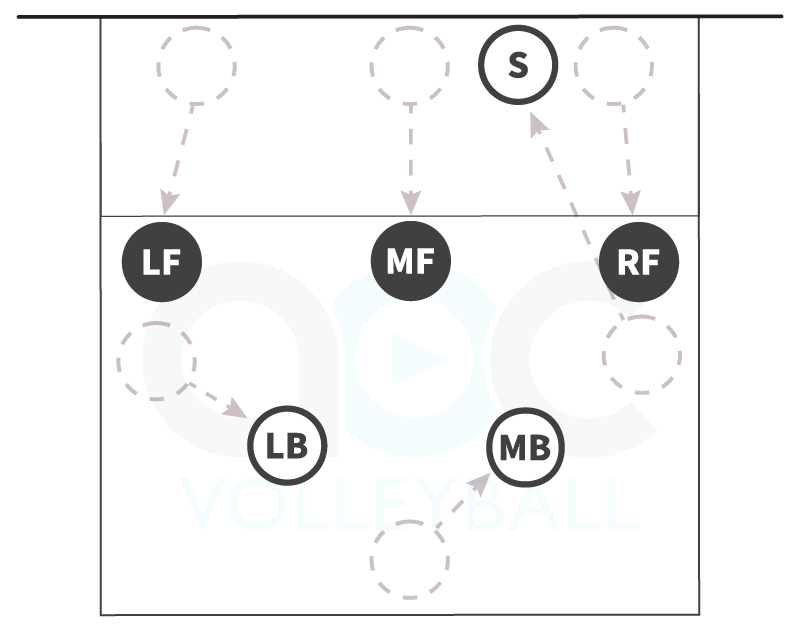
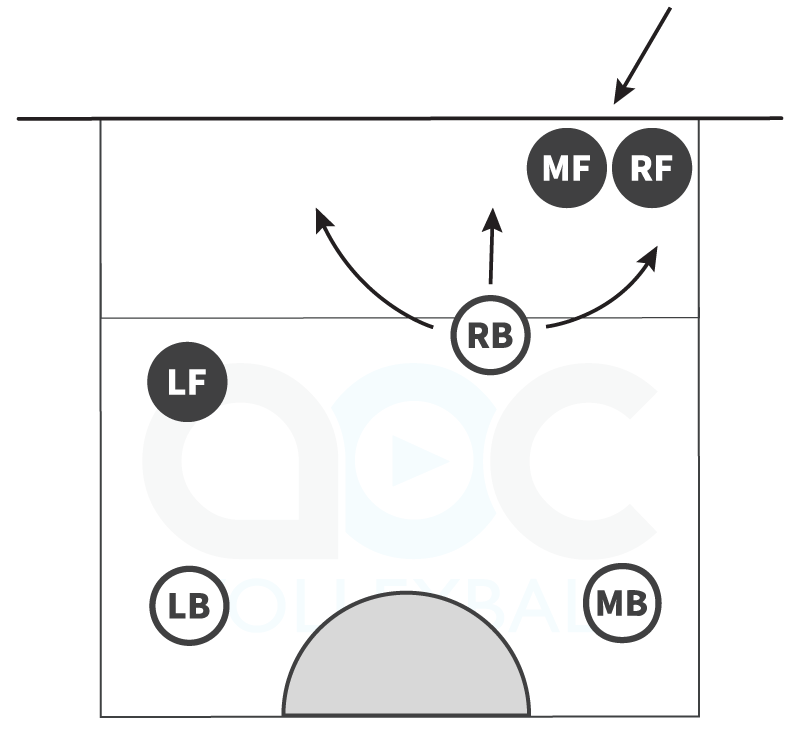
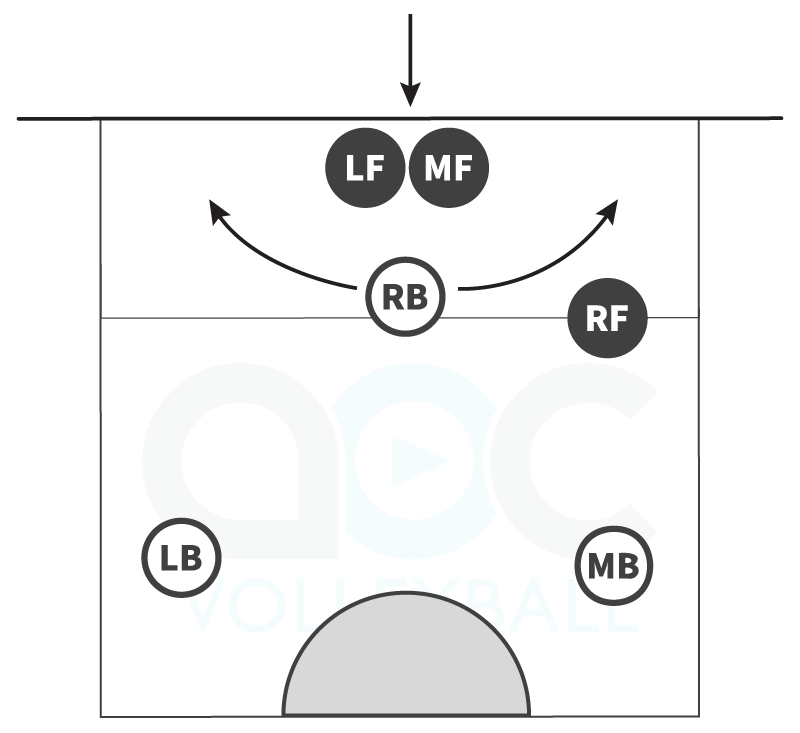
Free ball defense
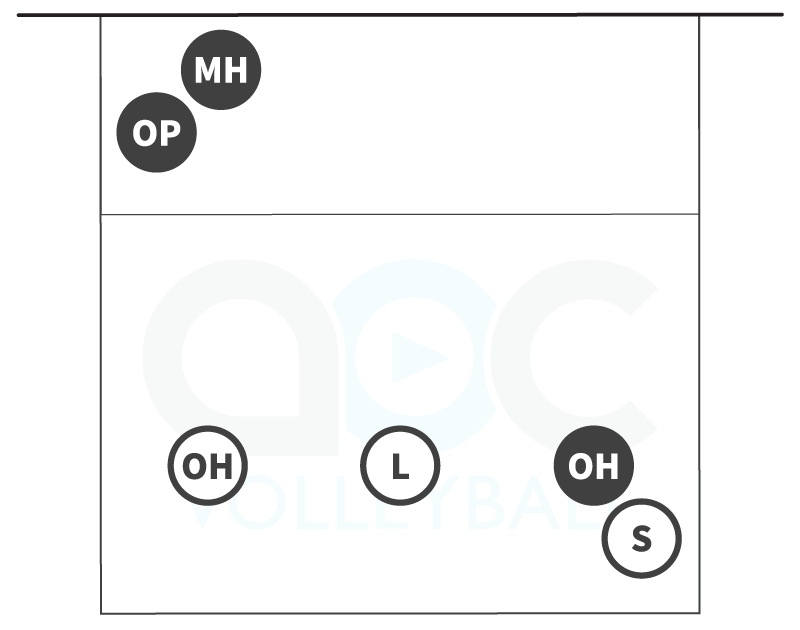
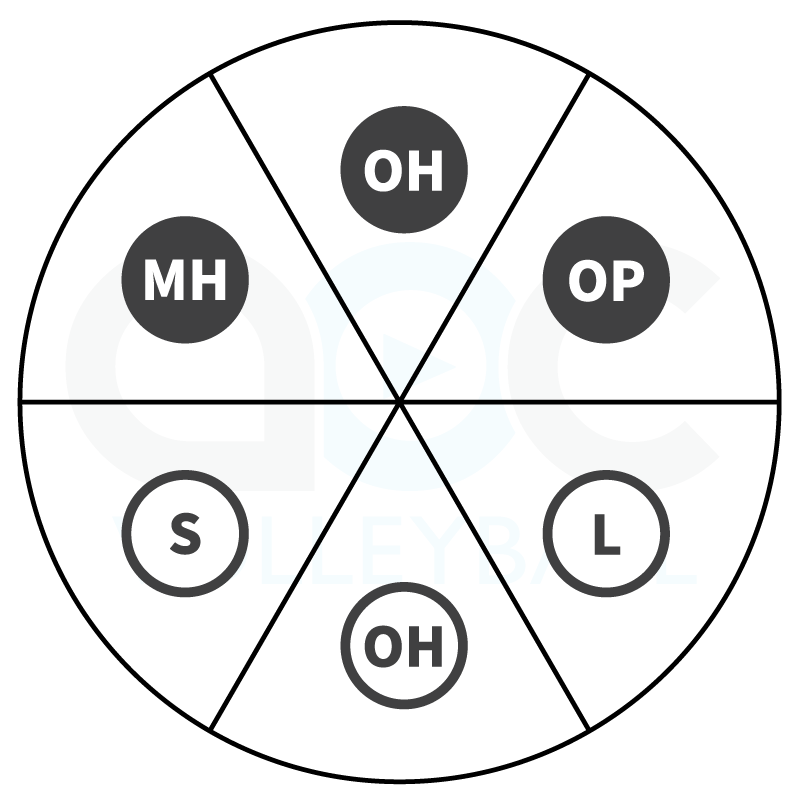
At younger levels, many opponent attacks are actually free balls because consistent passing and setting are still developing. Because of this, defenders should recognize the situation early, communicate to their teammates by yelling "free ball!," and adjust their position before the ball crosses the net.
As shown in the diagrams below, this adjustment includes the setter moving to their setting spot at the net, front row players dropping off the net into passing positions, and back row defenders balancing the rest of the court.
Front row setter
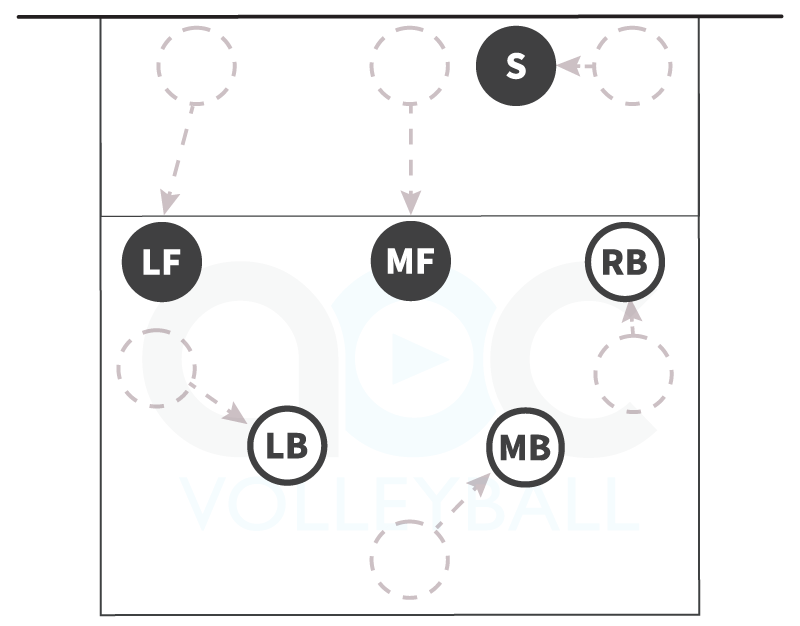
Back row setter
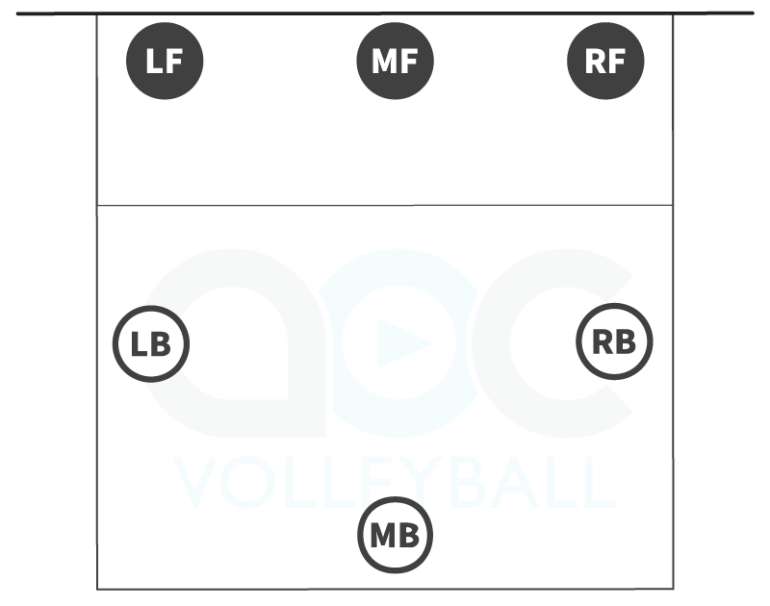
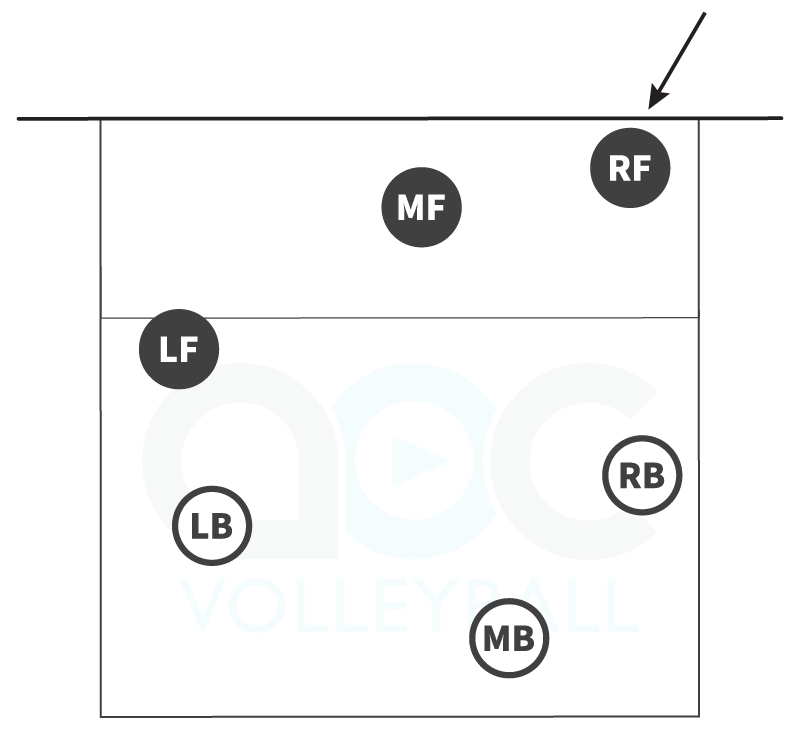
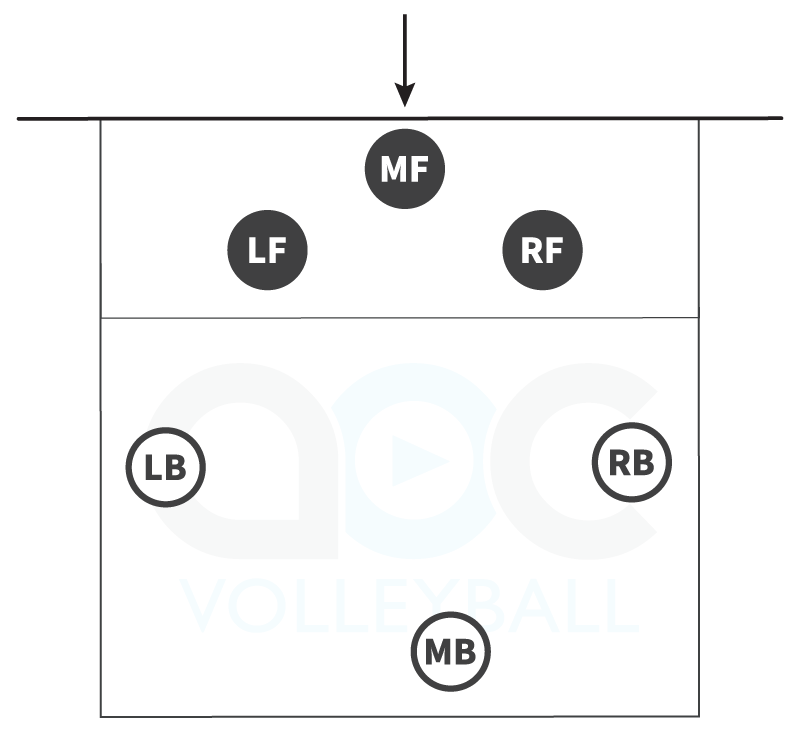
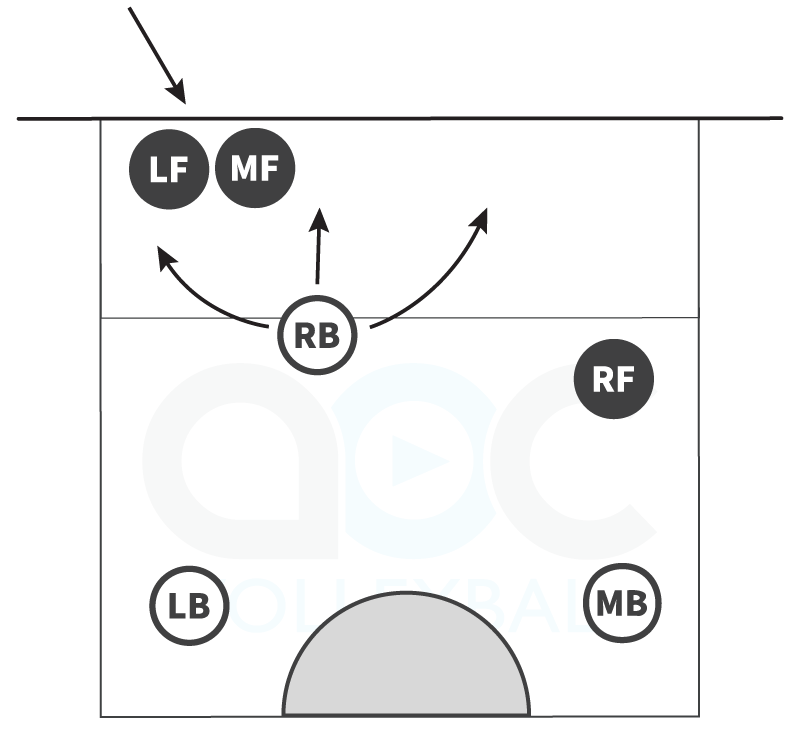
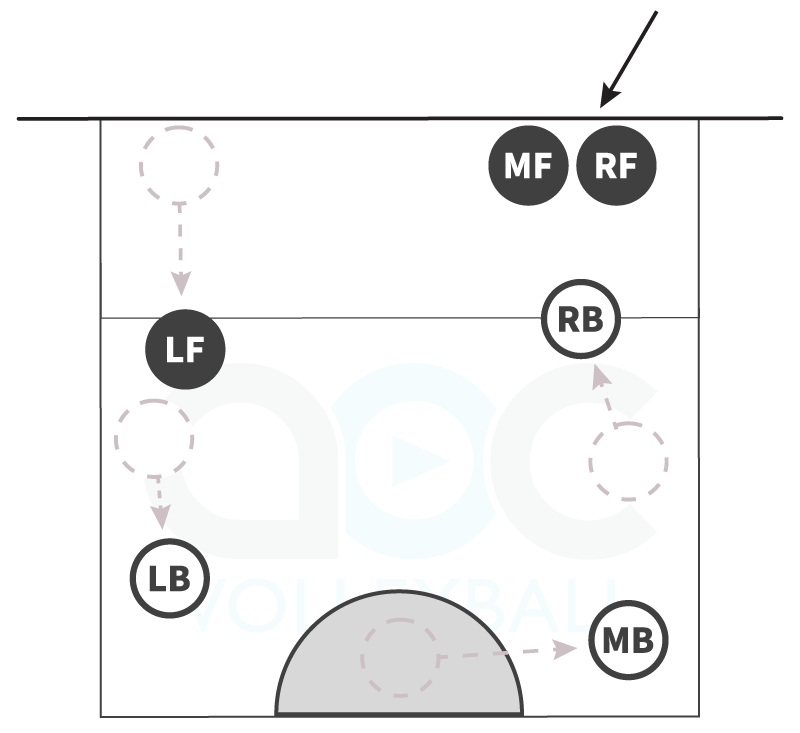
Simple volleyball defense: 1 blocker, 5 defenders
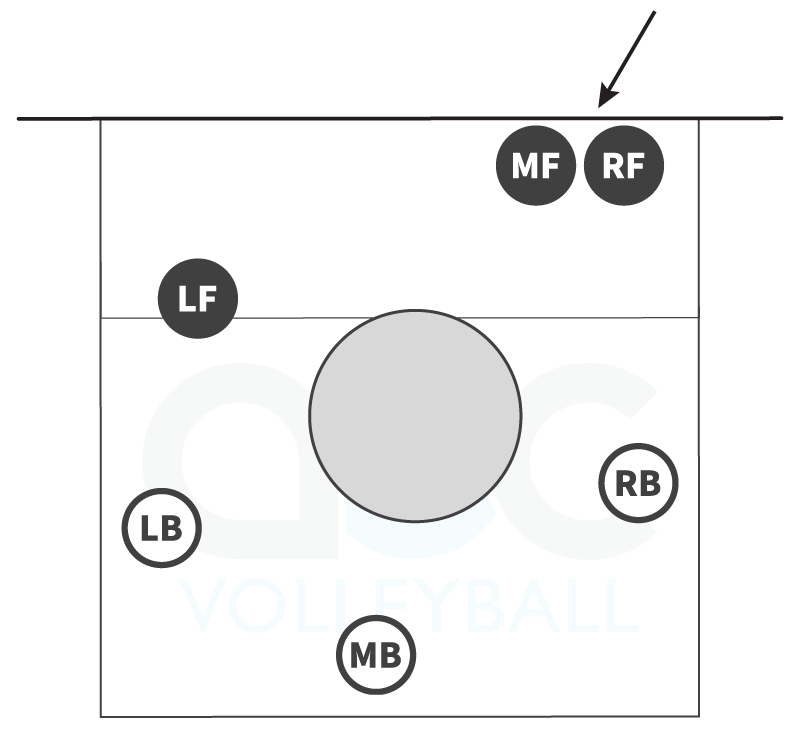
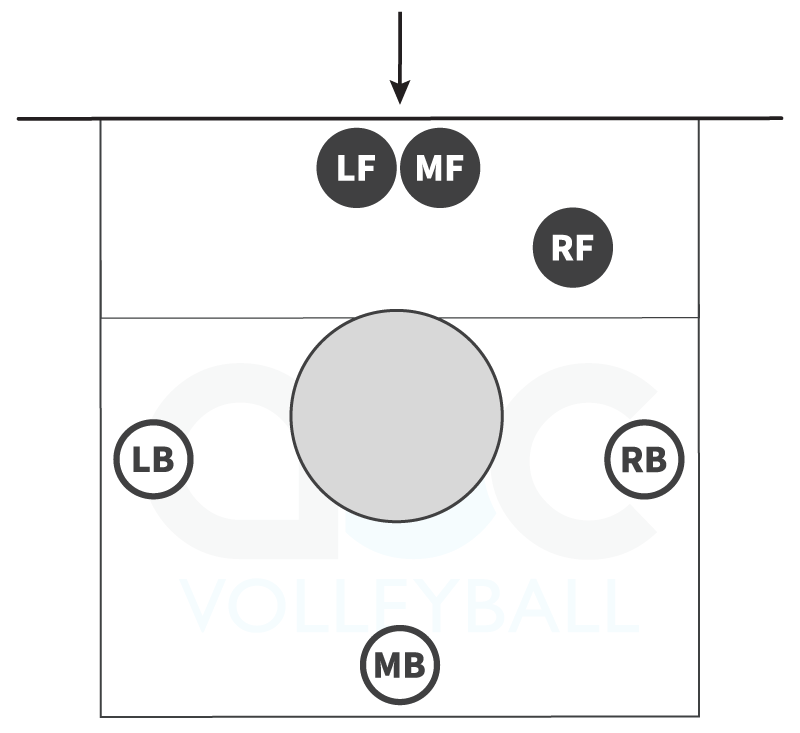
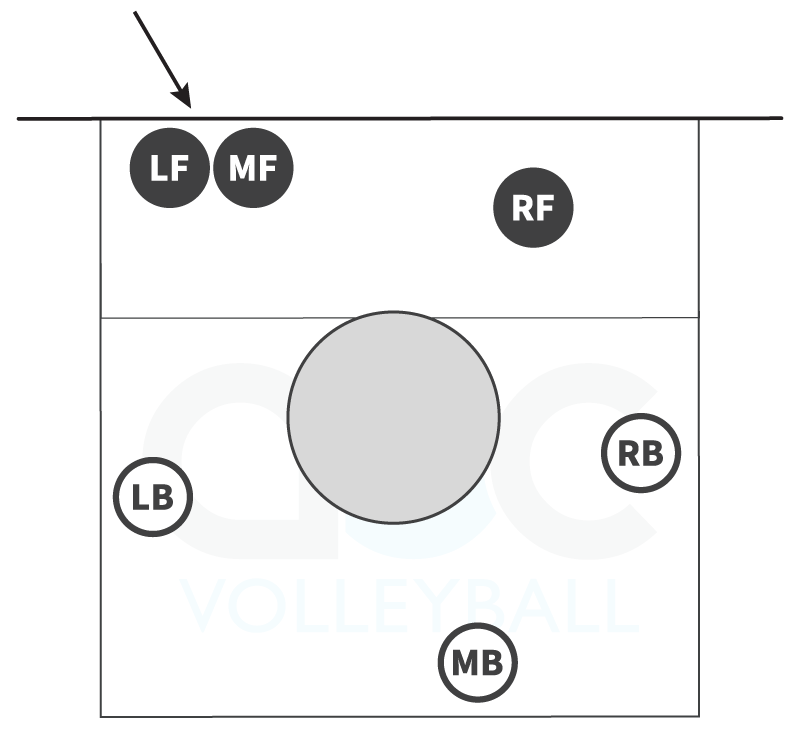
This is a great volleyball defensive system for teams that are just getting started. Whoever is lined up against the hitter stays at the net to block, while the other five players spread out to defend the court. This system is easy to understand, covers a lot of space, and works well against free balls and soft attacks, which are very common at the beginner level.
Attack from LF
Attack from MF
Attack from RF

As teams improve, coaches can introduce volleyball systems that involve multiple blockers and more defined defensive roles. Each system emphasizes taking away certain attacks while accepting risk elsewhere. You can see a few of the most common defensive systems below.
Volleyball perimeter defense
Perimeter defense, also called Middle Back defense, is a common volleyball defensive system where defenders stay deeper in the court, spaced around the perimeter, to better handle hard-driven attacks. This system works well against teams that swing with pace and hit the ball deep, because defenders have more time to read and react. The tradeoff is that it can leave the middle of the court vulnerable to tips and short shots, making reading the hitter and training players to run through tipped balls important.
You can learn more about volleyball perimeter defense in this video.
Attack from LF
Attack from MF
Attack from RF
Volleyball man up defense
Man up defense, also called Setter Up defense or Middle Up defense, places a defender right behind the block (usually the middle back or back row setter) so they can easily dig tips, roll shots, and other soft attacks to the middle of the court. This volleyball defensive system is most effective against teams that rely more on placement than power and against hitters who like to use off-speed shots.
One downside is that the defender in the middle of the court has less time to react to hard-driven balls if there’s a seam in the block, which makes this system risky against teams with quick sets, strong attackers, or powerful hitters. Another challenge is that the “Up” defender is often the setter, so if they are constantly digging balls, it can make running your offense more difficult unless you have other capable secondary setter options on the court.
Base position in man up defense
In Man Up defense, the base positions for the back row are different than in other systems. The “Up” defender (either the Right Back or Middle Back) starts up in the middle of the court, positioned just behind the block. The other two back row defenders start deeper in the court, as seen in the following diagram.
You can learn more about up defense in this video.
Here's a look at Man Up defense where the Right Back (RB) player, often the setter, plays up behind the block:
Attack from LF
Attack from MF
Attack from RF
And below is what Middle Up defense looks like, where the Middle Back (MB) player plays up behind the block:
Attack from LF

Attack from MF

Attack from RF

Volleyball rotation defense
Rotation defense is a volleyball defensive system where all defenders rotate as the ball is set with the middle back defender shifting towards the sideline to dig line hits and the right or left back rotating up behind the block to play short balls. This system puts pressure on your block to direct the ball into the angle or down the line and works well for teams with good defenders who move well, because it can provide strong coverage for both hard swings and off-speed shots. However, it may cause confusion if players are not comfortable moving and being stopped on contact during the rally.
For more information on how to run a rotation defense, watch this video.
Attack from LF
Attack from MF
Attack from RF
Defensive keys for young teams
At the younger levels, teaching volleyball defense doesn’t need to be complicated. The main goal is not to run a perfect system, but to help players be ready, active, and confident on the court. If players are moving their feet, staying balanced, and trying to keep the ball off the floor, you’re doing your job as a coach.
Rather than teaching players to stand in exact spots, focus on helping them understand where the ball is likely to go — a concept known as reading. Players should start in a basic position, then move early as they see the play develop. The key is teaching them to adjust before the ball is hit, not after. Encourage players to watch the pass, the setter, and the hitter so they can anticipate what’s coming next.
It’s also important to teach volleyball defense in terms of areas of responsibility, not specific marks on the floor. Instead of saying “stand right here,” help players understand what space they are responsible for—short balls, deep balls, or a section of the court. This reduces confusion and helps players feel more confident going after the ball.
Finally, be intentional about what you praise. At this stage, effort and movement matter more than perfect technique. Praise players for moving early, calling the ball, staying low, and chasing down balls—even if the play doesn’t end in a point. Those habits are the foundation of good defense and will carry over as players grow.
7. Identify your coaching values
Once you’ve set your coaching goals, the next step is to think about the values that will guide how you coach. Values act like a compass, helping you make decisions, set expectations, and create a culture for your team. In volleyball coaching, especially at the youth level, common values include sportsmanship, encouraging a growth mindset, fostering teamwork, keeping the experience fun, promoting accountability, and showing respect for all athletes. These aren’t rules to memorize, they’re touchpoints to help you focus on what matters most and build a positive environment for your players.
When coaching young or first-time athletes, a few key guiding principles can help set the foundation for long-term success:
- Create a positive, inclusive team environment: Model respect, sportsmanship, and teamwork so every player feels welcome, supported, and encouraged to contribute.
- Build relationships based on trust: Strong coach-athlete relationships make it easier for players to learn, take risks, and stay motivated.
- Encourage a growth mindset: Focus on effort, learning, and improvement, rather than outcomes.
- Teach proper technique and safety: Help athletes develop sound technique to reduce injury.
- Empower athletes to make decisions: Encourage players to think for themselves, problem-solve on the court, and take ownership of their development.
- Keep the game fun: Ultimately, helping athletes enjoy volleyball and want to continue playing is the most important measure of success.
These principles provide a solid foundation for creating a positive, productive, and enjoyable experience for your athletes, while giving you a framework to make coaching decisions and guide your team culture.
For more guidance on shaping your coaching philosophy and putting these values into action, you can check out this video on developing your coaching philosophy.
8. Prepare for practice
Before stepping on the court with your team, preparation is key. Volleyball practice planning helps you feel confident, keeps your players engaged, and ensures that your practice time is productive. At the same time, it’s important to remember that practice should be a safe space for learning. As Karch Kiraly always says, “We celebrate our mistakes in practice.” Players should feel comfortable experimenting, making adjustments, and building the muscle memory they’ll rely on later in matches.
Don't forget to think about the equipment you’ll need! At a minimum, you'll need a cart of volleyballs, a net, and a whistle. It's also a good idea to have a first-aid kit and a pump with a gauge to make sure your balls are properly inflated.
How to organize your practice
Planning your practice in advance is one of the most important steps for a successful session. When you know exactly what drills and activities you want to run, it helps you maximize your time in the gym, keeps players engaged, and ensures that you cover the skills and concepts you want to teach.
For a detailed explanation of practice preparation and execution including equipment needs, drill design, volleyball practice planning, and more, you can watch the 30-minute video from AOC Founder and master coach Terry Liskevych below.
Sample practice plan
A well-structured practice can follow a simple flow: start with a warm-up, move into skill development, progress to team drills, then finish with scrimmage or game-like play, and end with a cool-down. Planning how much time to spend on each section helps keep the session moving and prevents long periods of downtime where players might lose focus.
Even with a plan in place, it’s important to stay flexible. Sometimes a drill might go faster or slower than expected, or your athletes may need extra time on a particular skill. Adjusting on the fly is part of being an effective coach, and having a plan gives you a framework to make those adjustments without losing direction.
Here’s an example framework for a 60-minute beginner practice:
- Warm-up (10 min): Dynamic exercises and fun movement games
- Skill development (20 min): Focus on passing and serving fundamentals
- Team drills (20 min): Offensive and defensive drills, including cooperative games
- Scrimmage or game-like play (10 min): Let players practice skills in a controlled yet competitive setting
- Cool-down (5 min): Stretching and brief discussion of key takeaways
For more inspiration when planning volleyball practice, check out our beginners volleyball drills and basic volleyball drills in our pre-made practice plans and in our volleyball drill library.
Beginner volleyball drills
There are so many different drills you can use to teach the fundamentals of volleyball, and you can explore our drill library of youth volleyball drills and basic volleyball drills. Below are a few of our favorite volleyball drills for beginners:
- Warmup drill: Active butterfly progression (continuous movement, warms up multiple skills)
- Warmup drill: Over-the-net pepper (lots of ball control reps)
- Skill development: Kneeling serving progression (builds serving mechanics step by step)
- Skill development: Attacking progression for beginners (builds attacking mechanics step by step)
- Team drill: 3 vs. 6 drill (offensive reps against a full defense)
- Team drill: Three-in-a-row to rotate (encourages runs of points)
9. Prepare for matches
Your first match as a volleyball coach can feel overwhelming, but a little preparation goes a long way. By thinking ahead and planning key details, you’ll help your players feel confident and set the stage for a positive experience.
Before the match
Make sure you have all the basics ready: player jerseys, a properly set-up net, volleyballs and carts, a score sheet, and a whistle. Check that you know the basic volleyball rules of the competition, including how volleyball substitutions work, libero rules, and any local regulations.
Decide on your starting lineup ahead of time. Think about player strengths and roles (setter, outside hitter, libero, etc.) and communicate rotations clearly. Keep a simple cheat sheet or rotation chart on hand so you can easily manage substitutions and ensure everyone knows when they’re on the court.
Talk to your team before the match about expectations: sportsmanship, focus, and effort. Remind them of the skills and strategies you’ve practiced. Establish who will serve first, who your starting lineup is, and how substitutions will work. Having clear communication helps reduce anxiety for both you and your athletes.
Volleyball pre-game warmup
It’s helpful to think about pre-match preparation in two parts: an unofficial warmup and the official warmup. Both play an important role in helping your players feel ready to compete.
Unofficial pre-game warmup (before the timed match warmup begins)
This is what your players can do when they first arrive at the gym to start getting loose and preparing their bodies. During this time, you’ll stay on your own side of the court and focus on general movement and arm preparation. This might include things like dynamic exercises and a partner arm warmup. The goal here is simply to get warm and ready for more intense volleyball activity.
While teams are still in their unofficial warmup, the first referee will call team captains over for a quick coin toss to determine which team will serve first. Once that’s complete, the referee will signal the start of the official warmup by blowing the whistle.
Official pre-game warmup
This is the structured, timed warmup that takes place before every match. While exact timing varies by level, it generally follows this structure:
- 2-4 minutes sharing the court
- Each team gets 4-6 minutes with the full court
During the shared court time, each team gets one half of the court. This time is typically used for partner pepper and ball-handling work or a simple team pepper drill.
After that, each team gets the full court to themselves. This is a good time to focus on attacking and serving. A simple structure could include a few minutes of hitting lines (attacking off a setter from different spots along the net), followed by a few minutes of serving, with players split between end lines serving back and forth.
While your team is off the court during the opponent’s full court time, it’s a good opportunity to gather players briefly to share the starting lineup. Players can also get water and observe the opponent, noticing who their strong servers and attackers might be.
Once the official warmup ends, teams return to the bench for final lineup checks and reminders from the coach before taking to the court to begin the match.
During the match
Stay positive and keep instructions simple. Focus on key points like communication and effort rather than trying to micromanage every play. Substitutions and time-outs are tools you can use to support player development and manage the flow of the game, but don’t stress over making every move perfect. Learning happens in the moment, even for coaches.
After the match
End with a team huddle to highlight positives and acknowledge effort. Encourage players to reflect on what they learned and how they can improve next time. Now's not the time to get into what may have gone wrong during the match; save the teaching for your next practice.
This is also a good time to reinforce team values—how players supported each other, communicated, and handled challenges. Keeping the post-match message short and positive helps players leave feeling motivated and ready to keep improving. Remind them when the next practice or match is so they leave focused on what’s ahead.
What's next?
If you’ve made it through all of the information on this page (bravo!), you have a strong foundation for how to coach volleyball as a first‑time coach. If you’re ready to keep building, the free two‑week trial of our Premium membership is a great next step—no credit card required.
With a Premium membership, you'll get:
- 3,500+ training videos from college and Olympic‑level coaches, including skill‑training basics, simple drills, and player development.
- Unlimited playlists so you can group videos by practice, position, or skill focus.
- Position training series with 20+ video lessons each for key positions covering strategy, skill‑work, and drills.
- High School Prep Series and online coaching courses that walk you through head‑coaching philosophy, practice planning, and match management.
- Printable practice plans, worksheets, and handouts so you can adapt world‑class ideas directly to your team.
- 50% off coaching certifications (like our Level 1 Head Coach Certification) and 10% off coaching clinics for hands‑on learning with top coaches.
Start your free two‑week trial to get a taste of everything Premium has to offer.
If you’d like a structured approach to continuing your coaching education, the Level 1 Head Coach Certification is a natural next step. It gives you instant access to 6+ hours of A‑to‑Z volleyball instruction from Jim Stone, one of the most experienced and successful coaches in the game. You’ll get a step‑by‑step exploration of everything a head coach needs to know—from coaching philosophy and team chemistry to practice planning, skill development, match management, scouting, and injury prevention—all at your own pace.
If you’d prefer to keep exploring at your own pace, you can also head to our video library to learn from dozens of experienced coaches at every level. Remember, there’s no single “right” way to coach—so the more tools and perspectives you pick up, the more confident you’ll become in developing your own style.
Best of luck in your coaching journey—we’re here to help whenever you need it!